

In this tutorial, we're going to be drawing a retro game console controller. Rather than a perspective look, this one will have an isometric look. This tutorial is extremely detailed, and will be fun for all you classic arcade lovers.
Final Image Preview
Before we get started, let's take a look at the image we'll be creating. As always, the layered Photoshop file is available via our Psdtuts+ Plus membership.


Step 1
Let's open a new document using the settings shown below.


Step 2
Now we'll need to have some guides to make sure that everything in our document will be in the right place. And in order to put the guides in the correct place, we'll make some fixed sized selections.
Get the Rectangular Marque Tool, set style to Fixed Size and set Width and Height to 140 pixels. Click on the canvas, then while holding the left mouse button place the selection to the top left corner. Drag one horizontal and one vertical guide and snap them to the edges of the selection.
Drag the selection to the right bottom corner and get two more guides. Because we want our tool to snap to these guides, make sure that View > Snap is active.


Step 3
We can start drawing now. First create a new layer and name it "Upside." Pick 65% gray as your Foreground Color. Get the Rounded Rectangle Tool, set the Radius to 40 pixels, and select Fill Pixels in the tool options. Draw a rounded square as in the below image.
Go to Filter > Noise > Add Noise, then set the Amount to 2%. Also, set Distribution to Uniform and make sure that Monochromatic is checked.


Step 4
Now we'll make the circular part and the fire button. With the "Upside" layer selected in the Layers Palette, drag one vertical and one horizontal guide, and snap them to the center of the square.
Create a new layer, name it "Ring." Get the Elliptical Marque Tool, set the Style to Fixed Size and set Width and Height to 425 pixels. Make a selection and fill it with 85% gray. Hit Command + D to deselect, then place the circle in the middle of the canvas.


Step 5
We'll make another circular selection. This time set the selection Style to Normal. Next, while holding down the Alt + Shift keys, make a selection starting from the center of the canvas. This one should be smaller than the first one. We're going to delete the selection by hitting the Delete key, which gives us a ring. Now go to Select > Deselect (Command + D).
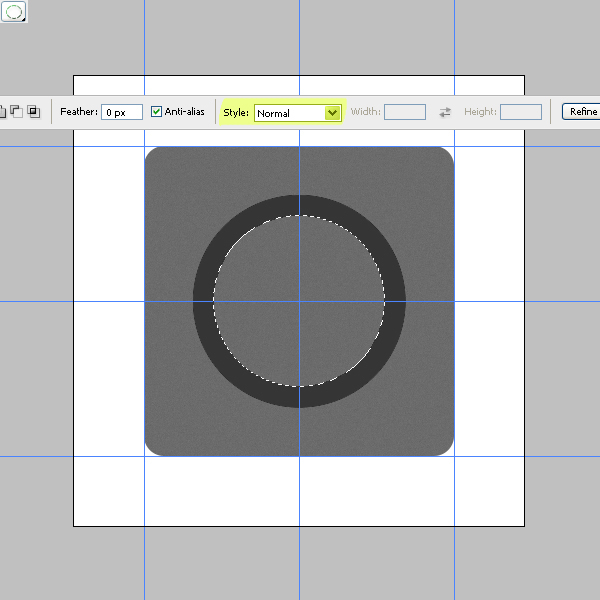

Step 6
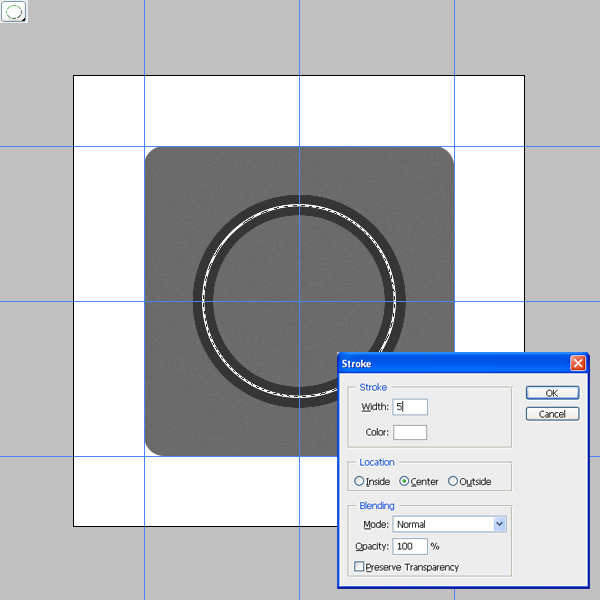
Create a new layer and name it "Dashes." As you can tell from the name, we're going to draw the dashed line on the ring.
Get the Elliptical Marque Tool. Starting from the center, make a selection as in the below image. Pick white as your Foreground Color and go to Edit > Stroke. Use these settings: Width set to 5, color of white, Location set to Center.

Step 7
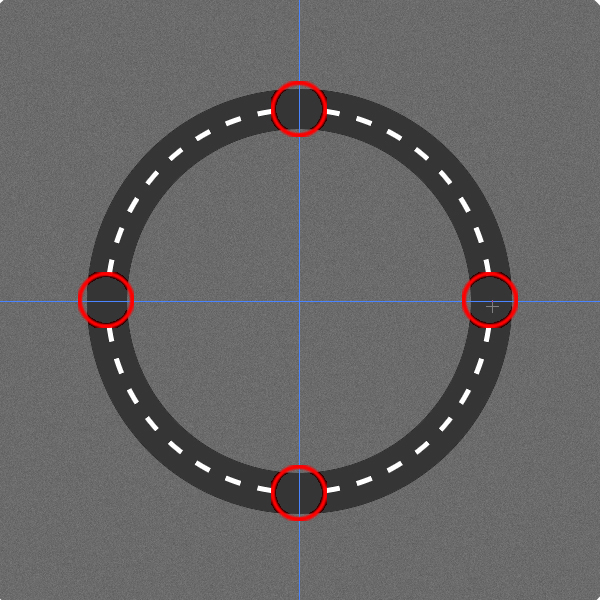
Now we need some gaps on this white ring. We'll take some help from shapes for that. Get the Custom Shape Tool (U). Open the Custom Shape Picker and pick "Registration target 2."
Hit Command + D to deselect. Create a new layer named "Gaps." Select Fill Pixels in the Tool Options, then starting from the center (hold down Alt + Shift) draw the shape, as in the below image.


Step 8
Command-click the "Gaps" layer thumbnail to load the selection. Go to Select > Inverse. Go back to the "Dashes" layer in the Layer Palette and hit Delete to clear the selection. Deselect by hitting Command + D. Delete the "Gaps" layer.


Step 9
Next, lets place arrows instead of the 12, 3, 6 and 9 o'clock dashes. Using the Eraser tool, with a Brush Hardness set to 100, erase these areas from the "Dashes" layer.

Step 10
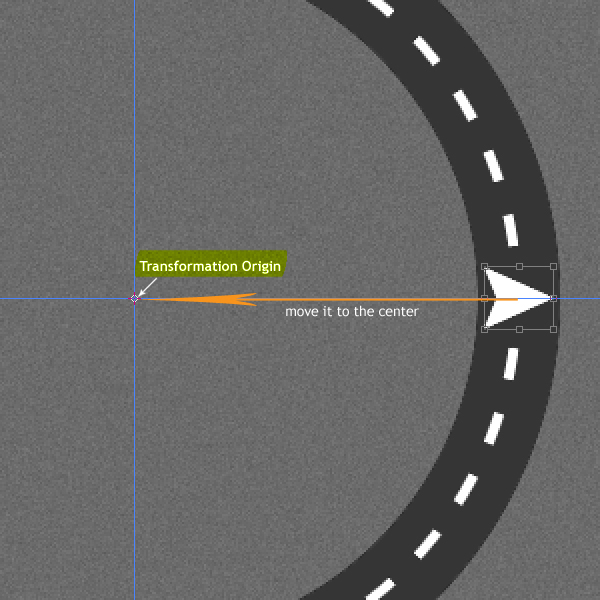
Create a new layer and name it "Arrow." Get the Custom Shape Tool, pick the "Arrow 6" shape, which is in the Arrows Set. Draw an arrow as in the below image. Duplicate the "Arrow" layer. Go to Edit > Free Transform (Command + T), and move the transformation Origin to the center of the canvas. If you can't grab the Transformation Origin, try grabbing it while holding down the Alt key.

Step 11
Holding down the Shift key, rotate the "Arrow copy" 180 degrees. Select both the "Arrow" and the "Arrow copy" layers in the Layer Palette, then go to Layer > Merge Layers hit Command + E, then duplicate the merged layer and Command + T. Next, while holding down the Shift key, rotate it 90 degrees. Now merge both arrow layers again. Name the merged layer "Arrows."


Step 12
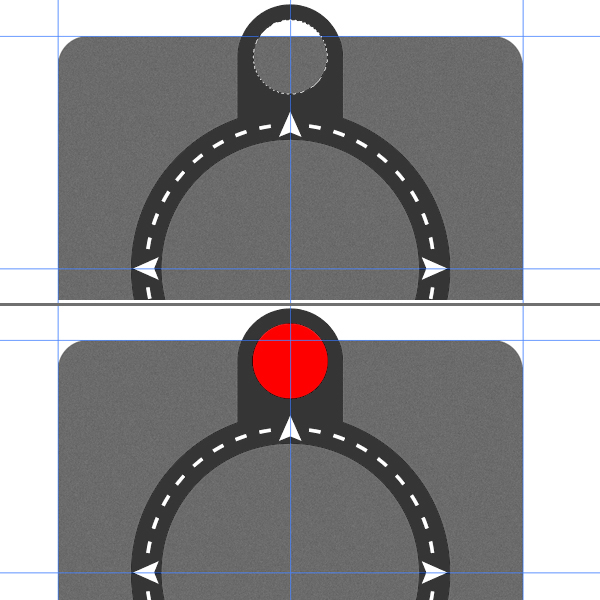
What we need to draw now is a rounded rectangle. Then we'll place the fire button on it. Create a new layer and name it "Fire Hole." Grab the Rounded Rectangle Tool. Set the Radius to 70 pixels. Draw a rounded shape as in the image below, then select the bottom part of it, and hit Delete. Move the "Fire Hole" layer below the "Ring" layer in the Layer Palette.

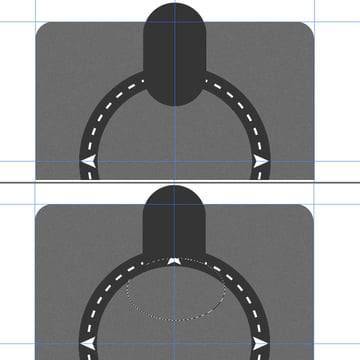
Step 13
Get the Elliptical Marque Tool, then select a circular area as in the image below, and hit Delete. Create a new layer above the "Fire Hole" layer and name it "Fire," then fill it with red.
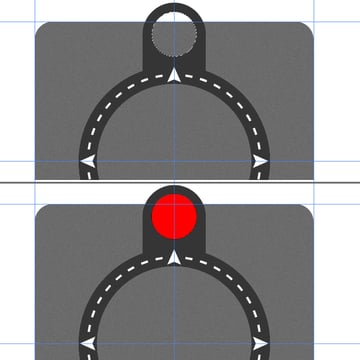
Step 14
Now ,select the "Fire" and "Fire Hole" layers, hit Command + T to enter Free Transform mode, and move the Transformation Origin to the center of the canvas. Next, hold down the Shift key and rotate it -45 degrees.
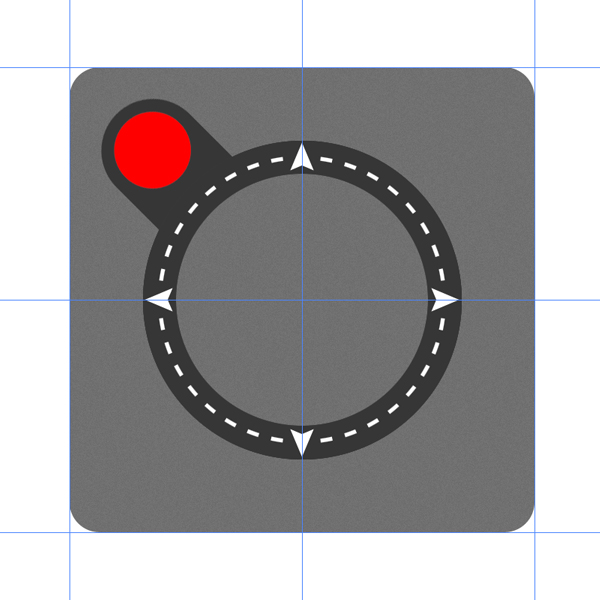

Step 15
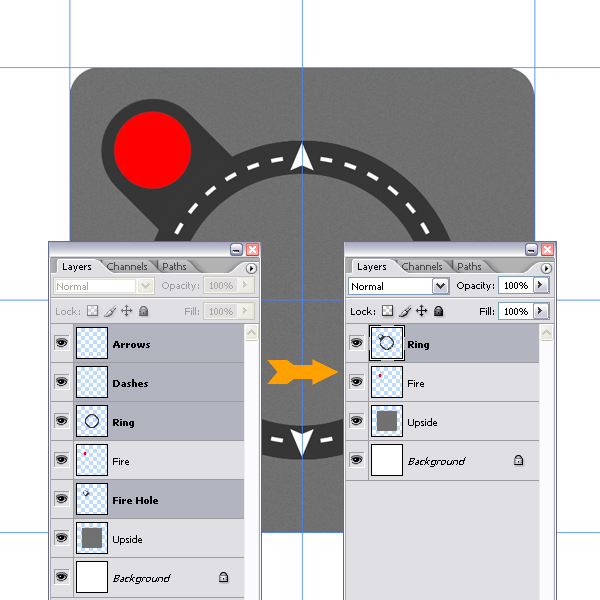
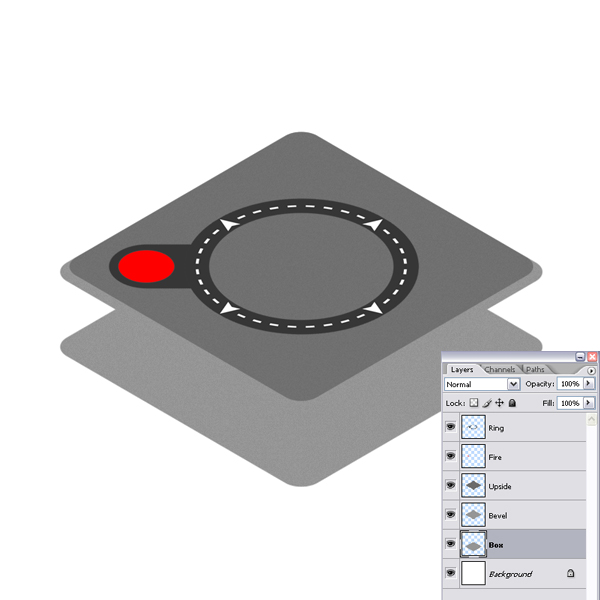
Select the "Arrows," "Dashes," "Ring," and "Fire Hole" layers in the Layers Palette, then go to Layer > Merge Layers. Now you should have four layers: "Background," "Upside," "Fire," and "Ring."

Step 16
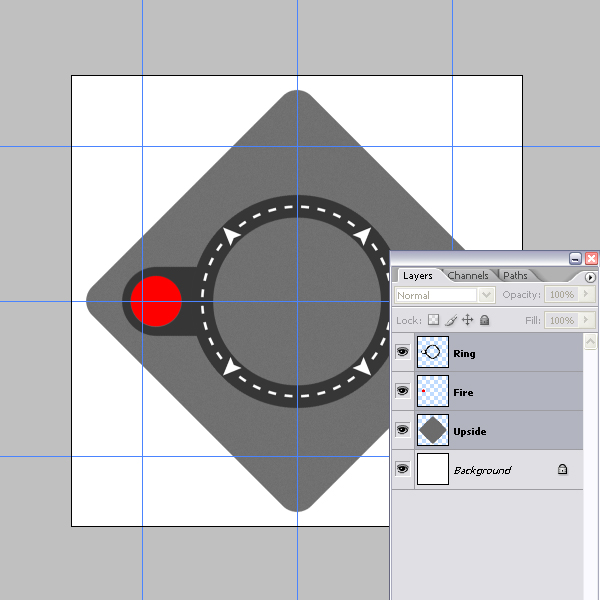
Select all layers except the "Background" layer. Hit Command + T and hold down the Shift key, rotate them -45 degrees, and hit Enter to apply.

Step 17
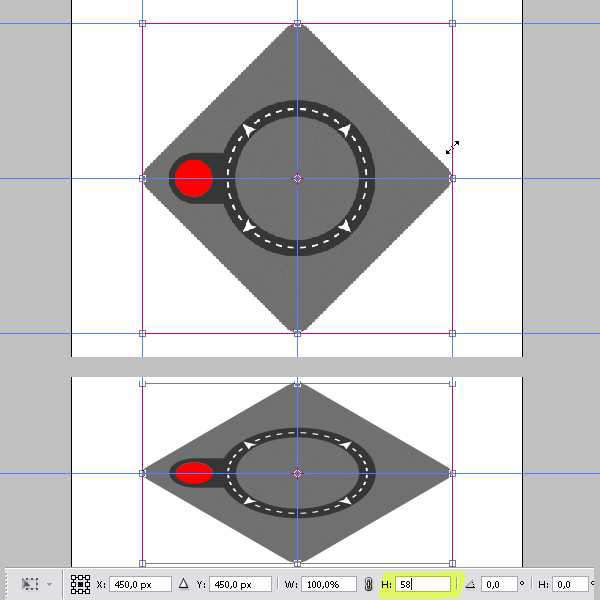
With the same layers still selected hit Command + T again, grab one of the corners of the bounding box, and Hold down the Alt key, then scale it until it snaps to the guides and apply. Hit Command + T again, this time set the Vertical Scale to 58%.
Vertically scaling gives our layers a perspective look, and the 58% will be the value we'll use whenever we want to achieve the same perspective look.

Step 18
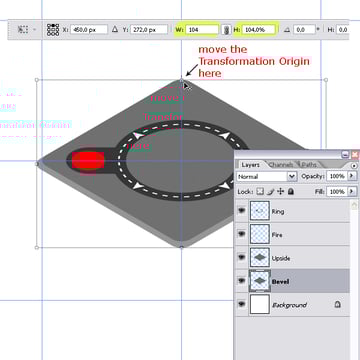
Command-click the "Upside" Layer thumbnail to load the selection. Create a new layer above the "Upside" layer and name it "Bevel." Fill the selection with 50% gray. Deselect by hitting Command + D. Move the "Bevel" layer below the "Upside" layer in the Layers Palette. Hit Command + T for Free Transform mode and move the Transformation origin to the top-middle of the bounding box. Set Vertical and Horizontal Scale to 104%. Hit Enter twice to apply.

Step 19
Duplicate the "Bevel" layer, name it "Box," and move it down 100 pixels. You can do it using the arrow keys on the keyboard when the Move Tool is selected. While holding Shift, press the Down Arrow key 10 times. Go to the Layers Palette and move the "Box" layer below the "Bevel" layer.

Step 20
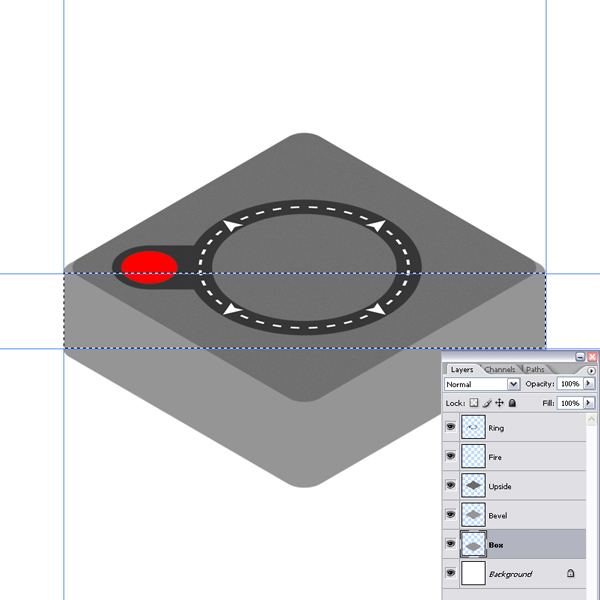
Now we'll need some guides, but lets get rid of the existing ones first. Go to View > Clear Guides. With the "Box" layer selected, drag two vertical guides and snap them to left and right corners. Drag one Horizontal and snap it to the center. Now select the "Bevel" layer in the Layers Palette and drag another horizontal guide to the center of "Bevel" layer, as in the image below.
Get the Rectangular Marque tool and make a rectangular selection as shown. Make sure that the "Box" layer is selected, fill the selection with 50% gray. Don't forget to deselect (Command + D).
Step 21
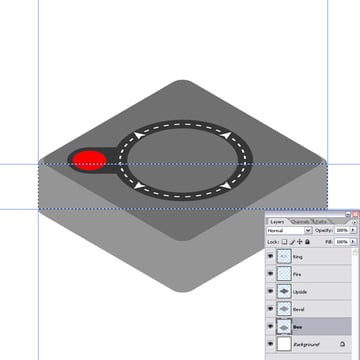
Now we'll add some noise. Go to Filter > Noise > Add Noise, set the Amount to 1%, set the Distribution to Uniform, and check Monochromatic. Go to Image > Adjustments > Hue/Saturation (Command + U), and set the Lightness to -20.
Let's also apply some noise to the "Bevel" layer. Go to the "Bevel" layer in the Layers Palette, then go to Filter > Noise > Add Noise, set the amount to 2%, and apply it.


Step 22
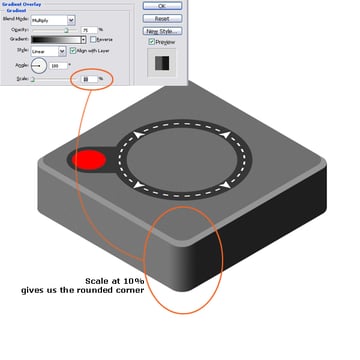
Let's put some light to our illustration. Assume that the light is coming from the left. We'll use a Gradient Overlay layer styles to make the dark and light areas. First, we'll apply a Gradient Overlay to "Box" layer with these settings: Blend Mode set to Multiply, opacity at 75%, Gradient set to black to white, Style of Linear, Angle set to 180, and Scale at 10%.

Step 23
Apply a Gradient Overlay to the other two layers; "Bevel" and "Upside." See the below image for the Layer Style settings.


Step 24
Command-click the "Upside" layer to load the selection. Create a new layer above the "Upside" layer and name it "Reflection." Get the Gradient Tool and pick the Steel Bar preset, which is located in the Metals set. Fill the selection with the gradient from the left edge to the right. Hit Command + D to deselect. Go to Image > Adjustments > Curves and tweak the curve as in the below image. Set the layer Blending Mode to Hard Light and Opacity to 15%. Now we have a nice reflection on the surface.


Step 25
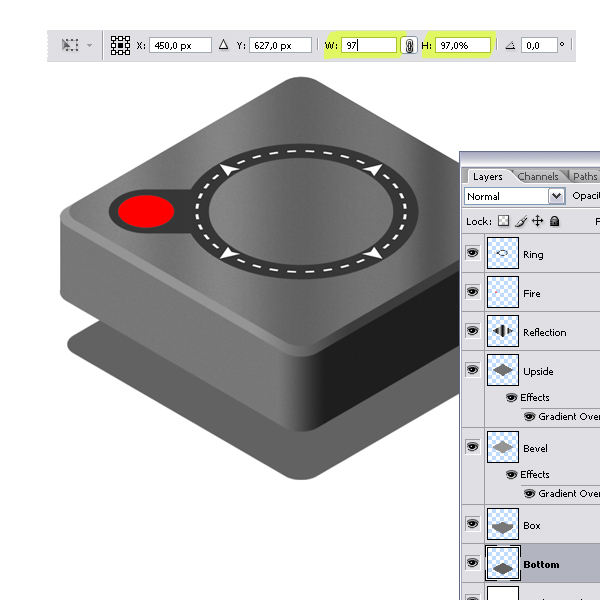
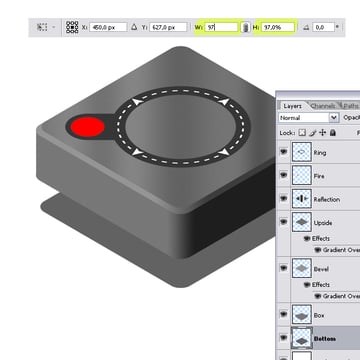
Command-click the "Bevel" layer thumbnail to load the selection. Create a new layer and name it "Bottom." Fill the selection with 70% gray. Hit Command + D to deselect. Get the Move Tool and while holding down the Shift key, hit the Down Arrow 17 times to move the layer 170 pixels down. Go to the Layer Palette and drag the "Bottom" layer below the "Box" layer. Hit Command + T and set the Vertical and Horizontal Scale to 97%.
Step 26
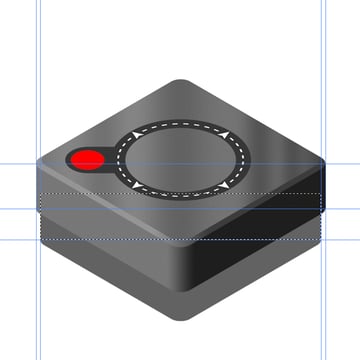
Make sure the "Bottom" layer is selected in the Layers Palette. Drag two vertical guides and snap them to the corners of the "Bottom" layer. Drag one guide from the upper ruler and snap it to the center of the "Bottom" layer. Get the Rectangular Marque Tool and make a selection as in the image below, then fill it with 70% gray. Hit Command + D to deselect.

Step 27
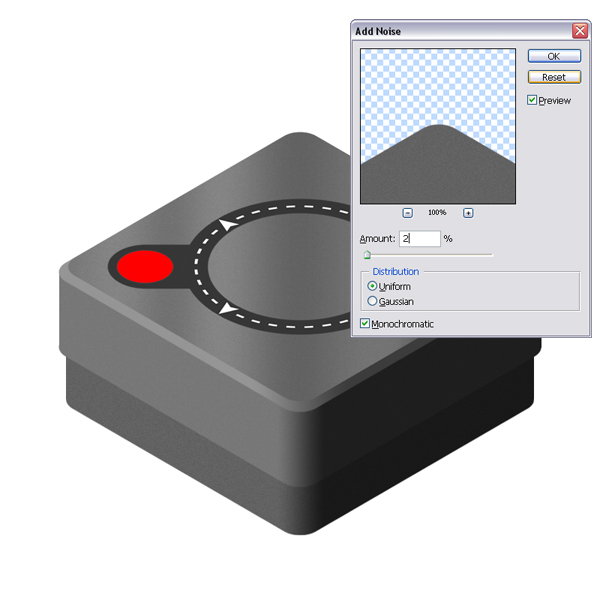
We need to apply a Gradient Overlay to this layer as well with the same settings we applied to the "Box" layer. Right-click the "Box" layer in the Layer Palette and choose Copy Layer Style. Right-click the "Bottom" layer and choose Paste Layer Style. Go to Filter > Noise > Add Noise. Set the Amount to 2%, set the Distribution to Uniform, and check Monochromatic.

Step 28
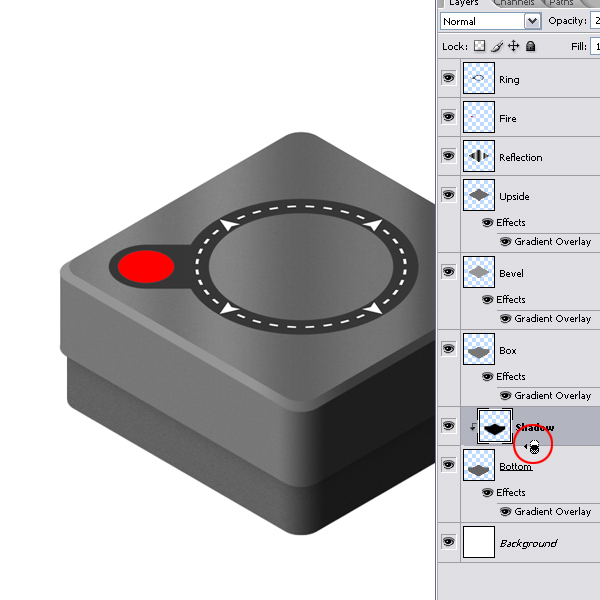
Create a new layer above the "Bottom" layer and name it "Shadow." Command-click on the "Box" layer thumbnail to load the selection. Fill the selection with black. Hit Command + D to deselect. Go to Filter > Blur > Gaussian Blur, set the Radius to 10 pixels, and apply.
Now we have the shadow of the "Box" on the "Bottom," but we want it to appear on the bottom part of the joystick only. Let's define the "Bottom" layer as a Clipping Mask for the shadow. Alt-click on the line between the "Shadow" and "Bottom" layers. Set the "Shadow" layer's Opacity to 20%.

Step 29
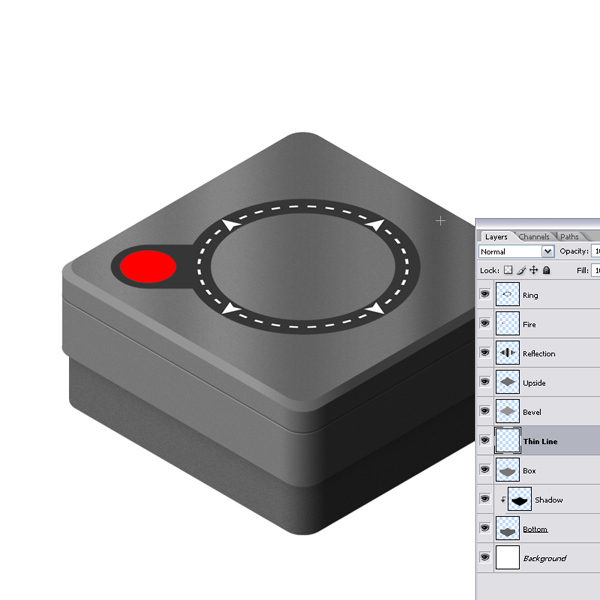
There is a thin embossed line on the "Box" part of the joystick. This is what we're going to make now. Command-click the "Bevel" layer thumbnail to load the selection. You can move selections using the Arrow Keys, but only if a selection tool is active at the moment.
Get the Rectangular selection tool, then while holding down the Shift key hit the Down Arrow key 3 times. This will move the selection 30 pixels down. Now create a new layer above the "Box" layer and name it "Thin Line."
Fill the selection with 40% gray, and don't Deselect it. Using the Up Arrow key, move the selection 3 pixels up, and then hit delete. Move the selection 2 pixels down and hit Command + U to bring up the Hue/Saturation dialog. Within the dialogue bring the Lightness down to -50. Now deselect by hitting Command + D. Copy the "Box" layer's Layer Style to the "Thin Line" layer.

Step 30
Now we'll make the bevel of the Ring. Command-click the "Ring" layer thumbnail. This will load the selection. Create a new layer below the "Ring" layer, name it "Ring Bevel." Fill the selection with 50% gray. Deselect by hitting Command + D. Next, hit Command + T, move and snap the Transformation Origin to the top-middle of the bounding box, then set the Horizontal and Vertical Scale to 102%.


Step 31
Select the "Ring" Layer and move it 2 pixels up. Now go back to the "Ring Bevel" layer and apply a Gradient Overlay with the Style set to Linear, Blend Mode set to Color Burn, with an opacity of 45% and Angle set to 180.


Step 32
Get the Magic Wand Tool, set the Tolerance to 10, make sure that Anti-alias is checked. Select the "Ring" layer in the Layers Palette. Select the inside of the ring with the Magic Wand tool. Create a new layer and name it "Ring Inner Bevel." Fill the selection with 75% gray. You can move the selections by using the Arrow Keys on the keyboard as long as a Marque Tool is active. Move the selection 5 pixels down and then Delete it. Deselect by hitting Command + D. Now we've given more depth to the ring.


Step 33
We need to give some depth to the fire button as well. Move the "Fire" layer to the top of the layer stack. Duplicate the "Fire" layer. Hit Command + U and set the Lightness to -20. Hit Command + T, move the Transformation Origin to top-middle of the bounding box, scale while holding the Alt + Shift keys, then apply the transformation. Next, move the "Fire copy" layer 5 pixels up. Also, move the "Fire" layer 2 pixels up.
To the "Fire" layer we'll apply a Gradient Overlay: Blend Mode set to Multiply, Opacity at 50%, Gradient set at black to white, Style of Linear, Angle set to 180, and Scale at 35%.
To the "Fire copy" layer we'll apply two layer styles. First, a Gradient Overlay with these settings: Blend Mode set to Multiply with an Opacity of 20%, Gradient set at black to white, with a Style of Linear, Angle set to 0, and Scale at 150%. Second, add an Inner glow with these settings: Blend Mode of Multiply, Opacity of 10%, Color set to black, and Size set to 13 pixels.


Step 34
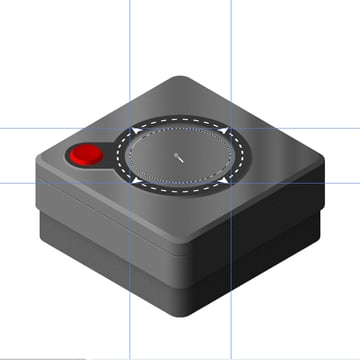
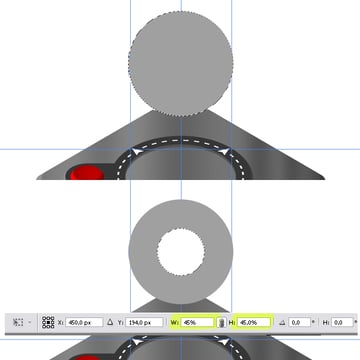
Now it's time to draw the rings around the handle. We'll be needing some guides but first let's clear the existing ones again. Go to View > Clear Guides. Create a new layer at the top of the layer stack and name it "R1." Select the "Ring" layer in the Layer Palette, get the Magic Wand Tool and click inside the ring. Go to Select > Modify > Contract and contract the selection by 10 pixels. Then drag guides around the selection, as in the below image. Deselect by hitting Command + D.

Step 35
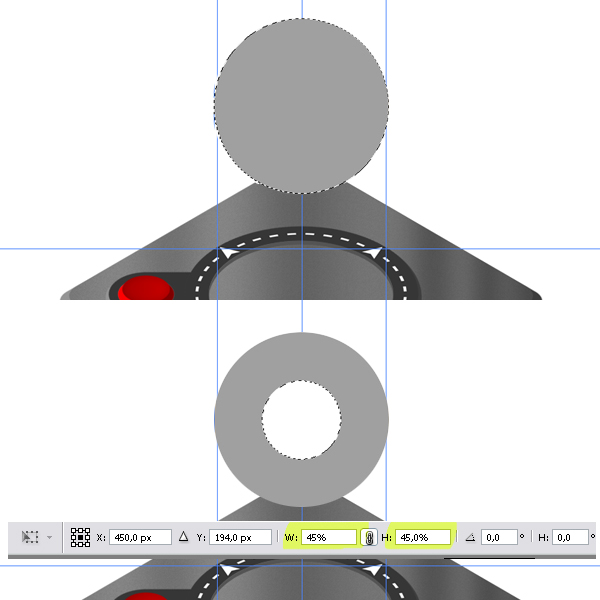
First, we'll draw the rings from a top view and apply some layer styles. Then we'll rasterize the layer styles and transform the rings to give them a perspective look, thus the layer styles will be transformed. Pick the Elliptical Marque Tool and make a circular selection, while holding down the Shift key, as shown below. Fill the selection with 45% gray. Go to Select > Transform Selection and set the Horizontal and Vertical Scale to 45%. Clear the selection by Hitting Delete and deselect with Command + D.
Step 36
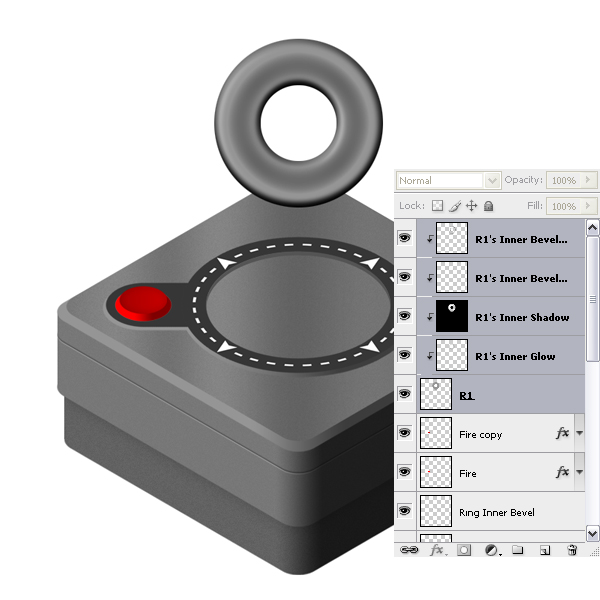
We'll apply some layer styles to "R1" layer. First, apply an Inner Shadow with these settings: Blend Mode of Multiply, Opacity of 100%, Angle set to -90 degrees, Distance set to 6 pixels with a Size of 8 Pixels.
Then apply an Inner Glow and use these settings: Blend Mode set to Multiply, Opacity at 100%, Color of black, Source set to Center, and Size set to 57 pixels. Finally, apply a Bevel and Emboss and use the following settings:
Style set to Inner Bevel, Depth of 230, Direction set to Up, Size of 10 pixels, Soften set to 6 pixels, Angle set to 170, and Altitude set to 64.


Step 37
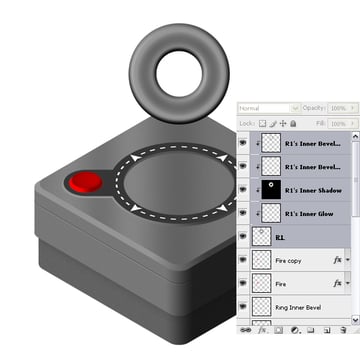
Go to Layer > Layer Style > Create Layers. This will turn layer styles into layers. Select all layers related to the "R1" layer and merge them by selecting them and going to Layer > Merge Layers. Rename the merged layer "R1" again. Now we have one of our rings. Let's transform it to fit the perspective.
Step 38
Hit Command + T to enter Free Transform mode and place and scale the "R1" layer to fit in the guidelines. Duplicate the layer and move the duplicate 2 pixels up to give some thickness. Select "R1" and "R1 copy" layers and merge by hitting Command + E. It's a good idea to rename the merged layer "R1" again, because it's getting a little bit confusing.
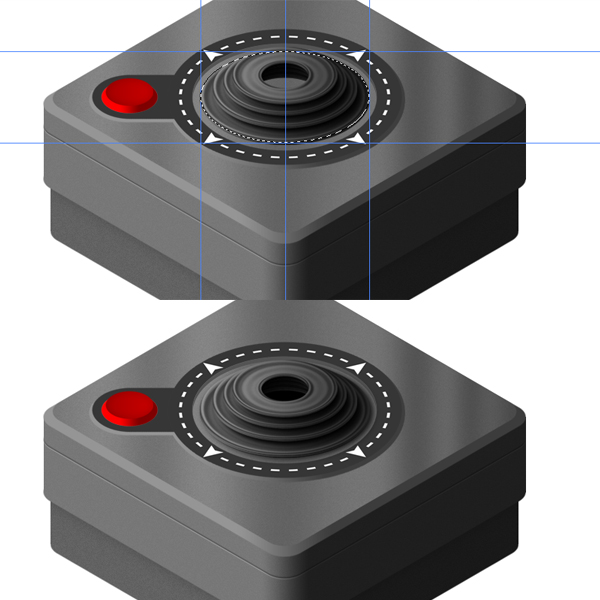
Go to Image > Adjustments > Curves (Command + M.) Tweak the curve as in the below image. Now duplicate the "R1" layer and name it "R2." Hit Command + T to enter Free Transform Mode and set the Horizontal and Vertical Scale to 80%, place the "R2" layer as shown below.
Now create a new layer above "R1" layer and name it "R2 Shadow." Command-click the "R2" layer thumbnail and fill the selection with black. Hit Command + D to deselect and go to Filter > Blur > Gaussian Blur, then set the Radius to 5 pixels. Move the shadow 6 pixels right and 8 pixels down. Alt-click the line between "R1" and "R2 Shadow" layers because we want to see the shadow only on the "R1" layer.


Step 39
We need two more rings, so duplicate the "R2" layer and name it "R3." Hit Command + T and set Horizontal and Vertical Scales to 85%. Create a new layer above the "R2" layer and name it "R3 Shadow." Command-click the "R3" layer thumbnail and fill the selection with black.
Hit Command + D to deselect and go to Filter > Blur > Gaussian Blur and set Radius to 5 pixels. Move the shadow 6 pixels right and 8 pixels down. Alt-click the line between the "R2" and "R3 Shadow" layers because we want to see the shadow only on the "R2" layer,.


Step 40
Duplicate the "R3" layer one more time and name it "R4." Hit Command + T and set the Horizontal and Vertical Scales to 85%. Create a new layer above the "R3" layer and name it "R4 Shadow." Command-click the "R4" layer thumbnail and fill the selection with black. Hit Command + D to deselect.
Go to Filter > Blur > Gaussian Blur and set the Radius to 5 pixels. Move the shadow 6 pixels right and 8 pixels down. Alt-click the line between the "R3" and "R4 Shadow" layers because we want to see the shadow only on the "R3" layer.


Step 41
Select the "R1," "R2," "R3," "R4" and related shadow layers, then merge them by going to Layer > Merge Layers (Command + E). Name the merged layer "Handle Rings." Move it 2 pixels down.
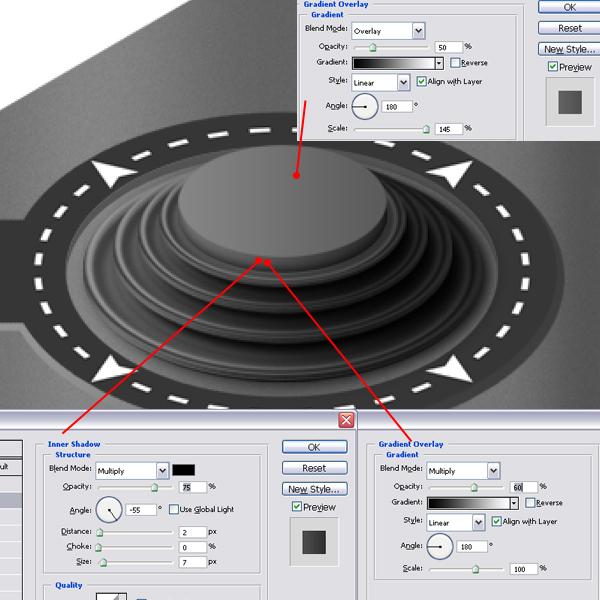
Apply a Gradient Overlay Layer Style to the "Handle Rings" layer. Use these settings: Blend Mode set to Overlay, Opacity at 50%, Gradient set at black to white, Style of Linear, Angle set to 180, and Scale set to 110%. We did apply the Gradient Overlay because the light is coming from the left and the left portion should be brighter.


Step 42
Create a new layer below the "Handle Rings" layer and name it "Handle Shadow." Get the Elliptical Marque Tool and make a selection as shown below. Fill the selection with black. Deselect by hitting Command + D. Go to Filter > Blur > Gaussian Blur, and set the Radius to 5 pixels. Move the "Handle Shadow" layer 5 pixels right and 3 pixels down.
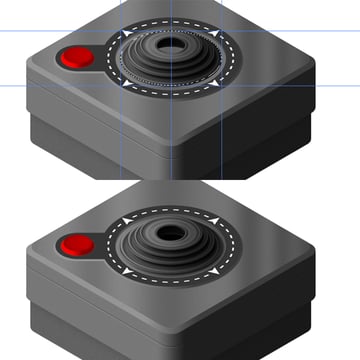
Step 43
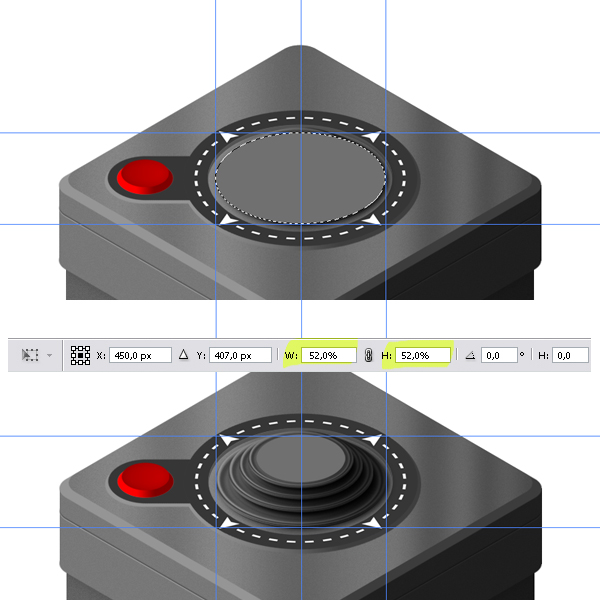
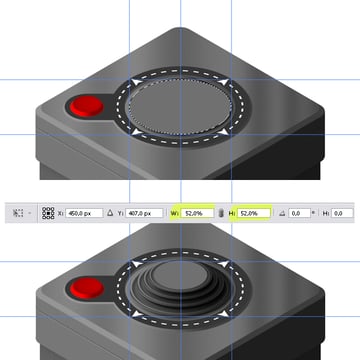
Create a new layer on top of the layer stack. Name the layer "Handle." Get the Elliptical Marque Tool and make a circular selection between the guides, as shown in the below image. Fill the selection with 65% gray. Hit Command + D to deselect. Hit Command + T, set the Horizontal and Vertical Scales to 52%, and apply it. Place the layer on top of the rings as shown below.
Step 44
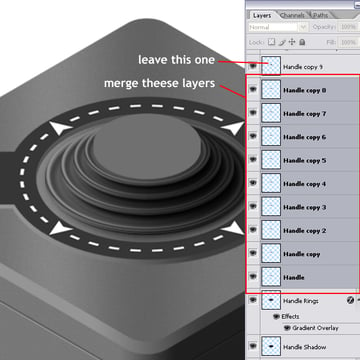
Duplicate the "Handle" layer, move the duplicate 1 pixels up. Repeat these steps 8 more times. Select the "Handle" layer, all the "Handle copy" layers except "Handle copy 9," and merge them by hitting Command + E. Rename the merged layer "Handle Side" and rename the "Handle copy 9" layer "Handle Top."

Step 45
Apply a Gradient Overlay and Inner Shadow layer styles to the "Handle Side" layer with more than one layer style. First, apply a Gradient Overlay: Blend Mode set to Multiply, Opacity at 60%, Gradient set at black to white, Style of Linear, Angle set to 180 degrees, and Scale at 100%. Next, apply an Inner Shadow: Blend Mode of Multiply, Opacity of 75%, Color of black, Angle set to -55 degrees, Distance set to 2 pixels, with a size of 7 pixels.
Now, apply a Gradient Overlay to "Handle Top" layer with these settings: Blend Mode set to Overlay, Opacity at 25%, Gradient set at black to white, Style of Linear, Angle set at 180 degrees, and Scale at 145%.

Step 46
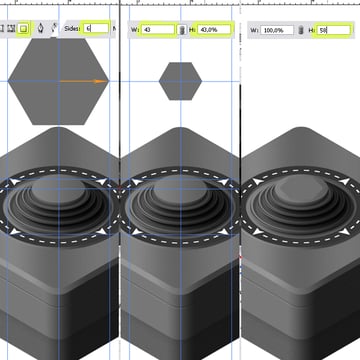
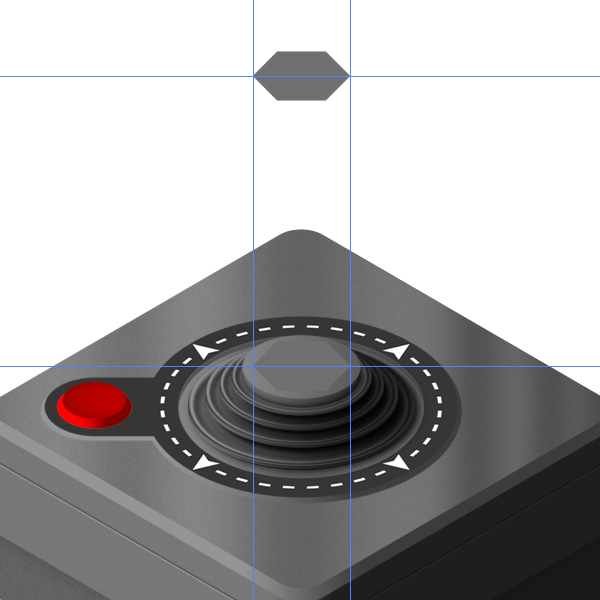
Create a new layer on top and name it "Stick Shadow." Get the Polygon Tool, set it to Fill Pixels and set sides to 6. Draw a hexagon starting from the center guide (see image below) with a foreground color of 65% gray. Hit Command + T, set the Horizontal and Vertical Scales to 43%, and apply it. This should bring the hexagon to a suitable size. Hit Command + T again, this time set the Vertical Scale to 58%. This is the value we use to give the perspective look. Now place the hexagon on the cylinder.

Step 47
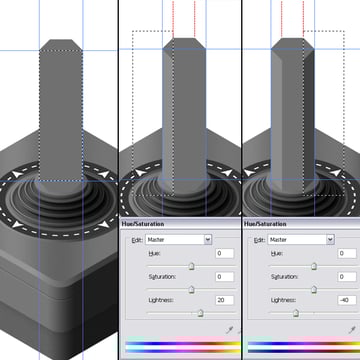
Duplicate the "Stick Shadow" layer and name it "Stick." Duplicate the "Stick" layer again and name it "Stick Top." Move the "Stick Top" layer 290 pixels up. I'm going to clear the guides by going to View > Clear Guides to avoid any confusion. With the "Stick" layer selected in the Layer Palette drag and snap two vertical guides to the left and right edges of the layer and one horizontal guide to the center. Next, do the same with the "Stick Top" layer selected.

Step 48
Get the Rectangular Marque Tool. Make sure Style is set to Normal. Make rectangular selection like in the image and fill with 65% gray. Now we should distinguish three sides of the stick by changing their lightness. Select the left side of the stick, hit Command + U and set the Lightness to 20. Now select the right side of the stick and Hit Command + U. This time set the Lightness to -40.

Step 49
Go back to the "Stick Shadow" layer in the Layers Palette. Hit Command + U and bring the Lightness to -100 to make the shadow black. Go to Filter > Blur > Gaussian Blur and apply with a Radius of 2 pixels. Set the Layer Opacity to 75%. Go to the "Stick" layer and apply a Gradient Overlay with the settings shown below.


Step 50
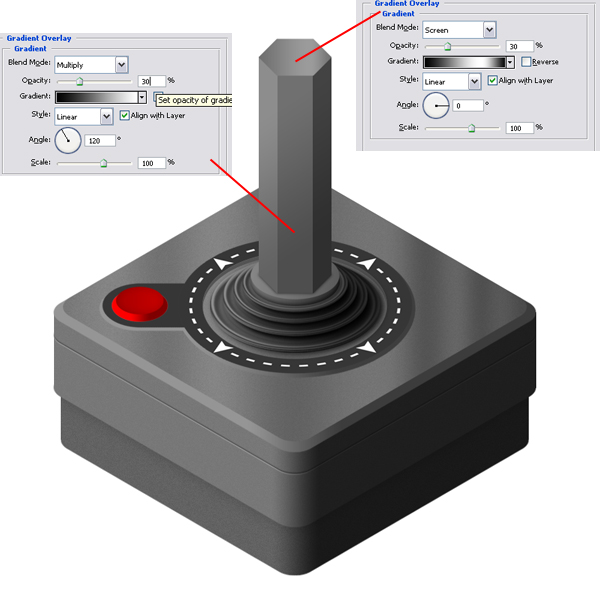
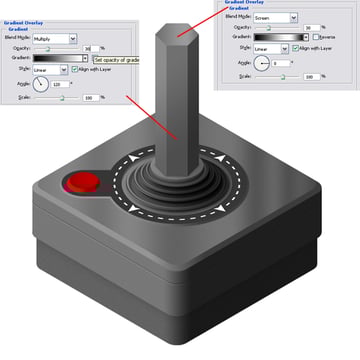
Go to the "Stick" layer and apply a Gradient Overlay with these settings: Blend mode of Multiply, Opacity at 30%, Gradient set at black to white, with a Style of Linear and Angle set to 120 degrees. Now go to the "Stick Top" layer and apply another Gradient Overlay with use these settings: Blend Mode set to Screen, Opacity at 30%, Gradient set at "Steel Bar," Style set to Linear, and Angle set to 0 degrees.
Step 51
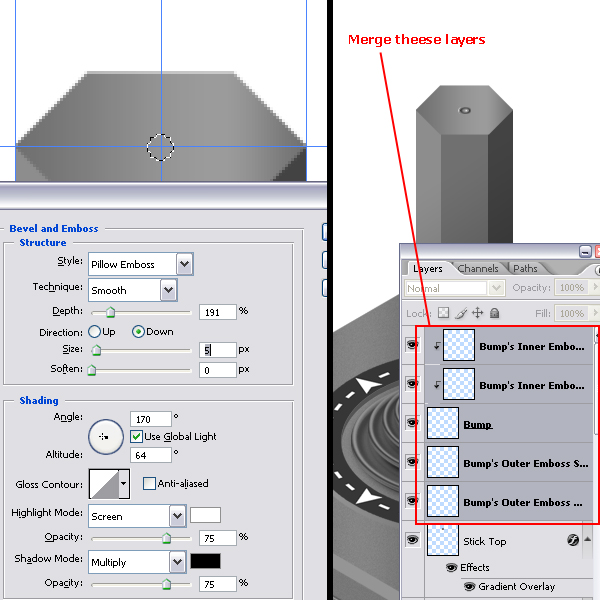
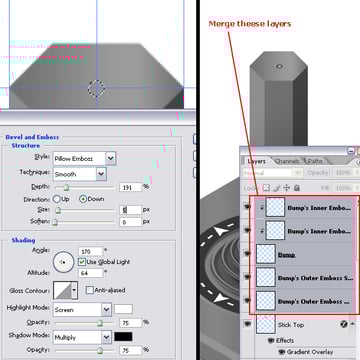
Create a new layer on the top of the layer stack and name it "Bump." Get the Elliptical Marque Tool and make a small circular selection as shown below. Fill the selection with 50% gray and apply Bevel and Emboss Layer Style with the settings shown below. Go to Layer > Layer Style > Create Layers. Select all the layers related to the "Bump" layer and go to Layer > Merge Layers (Command + E). Now hit Command + T to enter Free Transform mode and set the Vertical Scale to 58%.
Step 52
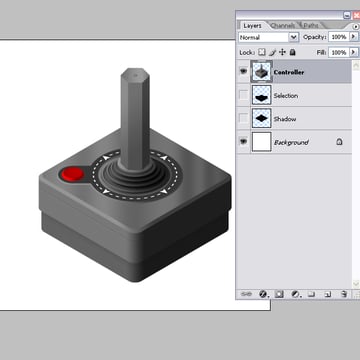
Now comes the most fun part... It's now time to merge all the layers and make the reflection and the shadows. Before merging the layers we're going to create two more layers first, which we will be needing in the next step. Create a new layer just above the "Background" layer and name it "Shadow." Command-click the "Bevel" layer thumbnail to load the selection. Fill the selection with black on the "Shadow" layer. Create another new layer above the "Shadow" layer and name it "Selection." Command-click the "Bottom" layer thumbnail to load its selection, then fill the selection with black on the "Selection" layer.
Now make the "Background," "Shadow," and "Selection" layers invisible. Make sure one of the visible layers is selected. Go to Layer > Merge Visible. This will merge all visible layers into one. Name the merged layer "Controller." Now you should have four layers: "Controller," "Selection," "Shadow," and "Background."

Step 53
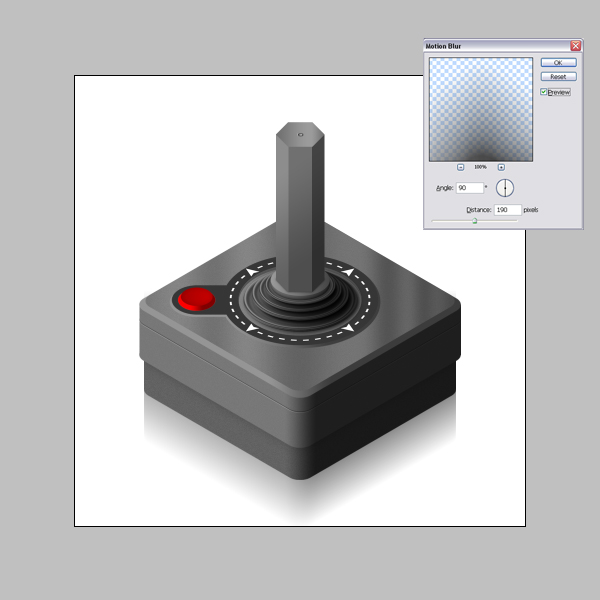
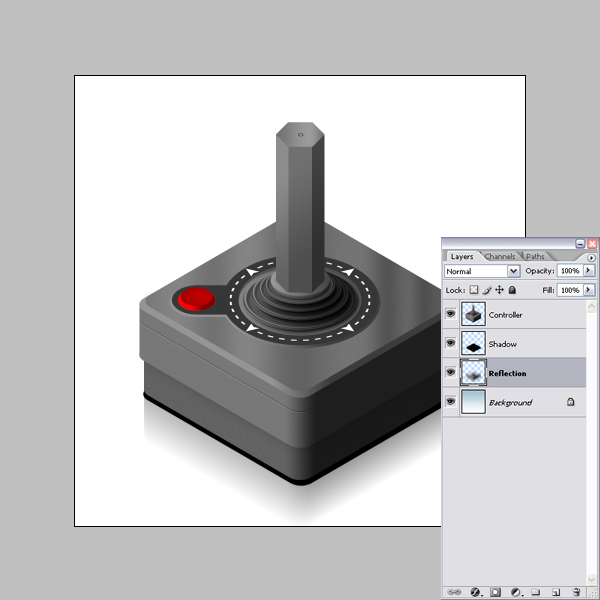
Let's first make the reflection. We'll reflect the bottom part only, that's why we have its selection. Command-click the "Selection" layer thumbnail to load the selection. Make sure the "Controller" layer is selected in the Layer Palette, then go to Layer > New > Layer via Copy (Command + J). Rename the new layer "Reflection" and drag it above the "Background" layer in the Layers Palette. Deselect by hitting Command + D. Go to Filter > Blur > Motion Blur. Set the Angle to 90 degrees and Distance to 190 pixels. We don't need the "Selection" layer anymore, so we can Delete it.

Step 54
Go to the "Shadow" layer in the Layers Palette and move it down, as shown in the below image. Go to Filter > Blur > Gaussian Blur, and set the Radius to 6 pixels. Also, set the Layer Opacity to 70%.

Step 55
Now finally our Retro Controller illustration is finished. I applied a gradient in the background. Here is the final image. That was a quite long tutorial. Hope you learned something new and had fun.
Subscribe to the Psdtuts+ RSS Feed for the best Photoshop tuts and articles on the web.


