

In this tutorial, we're going to draw a beer glass with some beer in it. We'll create the shiny curly glass with reflection, put some beer in it, add some bubbles, and finally we'll make the shadow and the reflections. Meanwhile, I hope you'll have some fun and learn some cool technics too.
Final Image Preview
Before we get started, let's take a look at the image we'll be creating. Click the screenshot below to view the full-size image. As always, the layered Photoshop file is available via our Psdtuts+ Plus membership.

Step 1
Create a New Document 800 pixels wide by 1100 pixels high at a resolution of 300 pixels/inch. Drag a vertical Guide to somewhere near the middle of the document. Get out the Pen Tool (P) and in the Paths mode draw a path, as in the image below. This is going to be one half of our glass.
Go to the Paths Palette. Command-click the "Work Path" thumbnail to turn the path into a selection. Go back to the Layers Palette, create a new layer, and name it "Half." Fill it with the color #ccd9dd. Then hit Command + D to deselect.


Step 2
Duplicate the "Half" layer (Right click on it in the Layers Palette and choose Duplicate Layer). Flip the duplicate horizontally by going to Edit > Transform > Flip Horizontal. Move the right piece to the right place. Select the "Half" and "Half copy" layers, then Merge them (Command + E.) Name the merged layer "Outer Glass."
Apply a Gradient Overlay Layer Style. Use these settings: Blend Mode set to Overlay, Opacity at 40%, Gradient set at Black to White, Style of Linear, and Angle set to 153.


Step 3
Duplicate the "Outer Glass" layer and name it "Inner Glass." Hit Command + T to enter Free Transform mode. Then set the Horizontal Scale to 95% and the Vertical Scale to 94%. Hit Enter twice to apply the transformations.
Double-click on the Gradient Overlay Layer Style in the layer Palette to change the settings. Set the Blend Mode to Color Burn and Opacity to 65%. Also, change the Angle to 125. Then position the layer, as in the image below.


Step 4
Now Command-click on the "Inner Glass" layer Thumbnail to load the selection. Go to Select > Transform Selection. Rotate the selection 180 degrees, move it up and place it as shown below. Double-click inside the selection to apply the transformations.
Command + Alt + Shift-click the "Inner Glass" layer thumbnail to intersect the selection with the layer. Create a new layer, name it "Opening," and fill the selection with the color #99b2bb. Set Layer Opacity to 20%.


Step 5
Create a new layer and name it "Reflection." Use the Rectangular Marque Tool to make a rectangular selection that is bigger than the glass. Get the Gradient Tool, choose the "Steel Bar" preset, which is in the Metals Set. Then fill the selection with a Linear Gradient from the left edge to the right one. Hit Command + D to deselect. Go to Image > Adjustments > Curves (Command + M.) Then tweak the curve to get something shiny.


Step 6
Set the "Reflection" Layer Opacity to 50%. Go to Edit > Transform > Warp. Then Warp the gradient to fit in the shape of the glass. Make sure that it is slightly bigger than the glass, as in the image below. Hit Enter to Apply the Warp.


Step 7
Command-click the "Outer Glass" layer thumbnail to load the selection. Go to Select > Inverse to inverse the selection and hit Delete. Hit Command + D to deselect. Set the Blending Mode to Screen and Opacity to 70%.


Step 8
With the "Reflection" layer still selected, click the "Add Layer Mask" button, which is located at the bottom of the Layers Palette. This will add a Layer Mask to the layer. Get the Gradient Tool. First choose Foreground to Transparent and Check Reverse. Pick black as foreground color.
Drag and fill the mask with the gradient. Then pick white as the Foreground Color, uncheck Reverse in the Gradient Tool options and fill the bottom part of the mask with white, as in the image below.


Step 9
Get the Pen Tool (P), choose Paths Mode, and draw a path as in the image below. Go to the Paths Palette and Command-click the Work Path thumbnail to turn it into a selection.


Step 10
Go back to the Layers Palette and Command + Alt + Shift-click the "Inner Glass" layer Thumbnail to intersect the selection with the Inner Glass. Create a new layer and name it "Beer." Fill the selection with color #ffb411. Move the "Beer" layer below "Reflection." Deselect by hitting Command + D.


Step 11
Apply a Gradient Overlay Layer Style to the "Beer" layer with these settings: Blend Mode of Color Dodge, Opacity of 30, Style of Radial, Gradient of black to white, Reverse set to checked, Angle of 90, Scale set to 115%. The gradient is centered to the layer. We want the bottom to be brighter, so we should move the gradient down. You can do it by clicking and dragging while the Gradient Overlay dialog box is open.


Step 12
Now apply an Inner Shadow Layer Style to the "Beer" layer with these settings: Blend Mode of Multiply, Color of #ee6611, Opacity set to 60%, Angle of -90, Distance set to 15px, and Size set to 30px.


Step 13
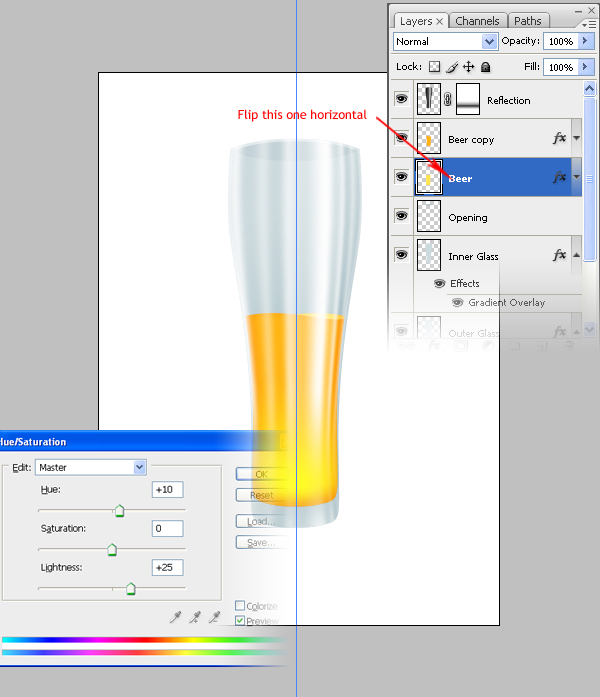
Duplicate the "Beer" layer. Photoshop will name it "Beer copy." Go back to the "Beer" layer and go to Edit > Transform > Flip Horizontal. Go to Image > Adjustments > Hue/Saturation (Command + U), and use these settings: Hue of +10, Saturation of 0, and Lightness of +25.
Step 14
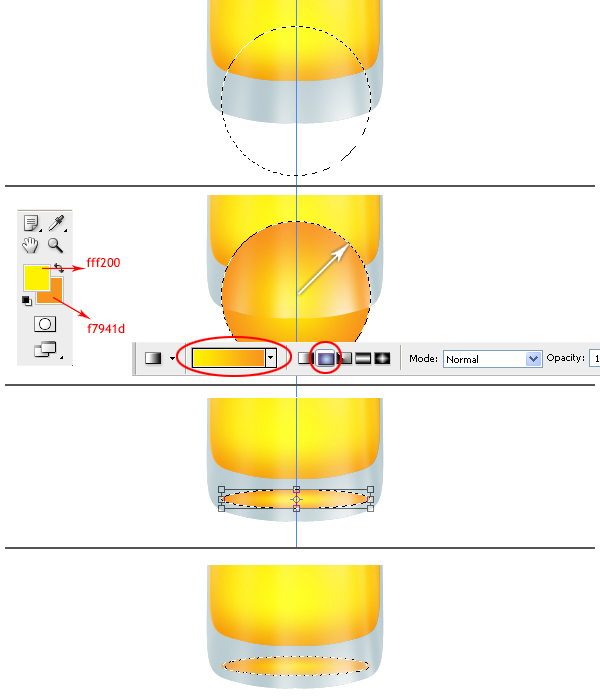
Create a new layer below the "Reflection" and name it "Refraction." Make a circular selection using the Elliptical Marque Tool. Pick #fff200 as the Foreground color and #f7941d as the Background color. Get the Gradient Tool, open up the Gradient Picker, and pick Foreground to Background. Also, choose a Radial Gradient. Fill the selection beginning from the center moving toward the outer edge.
Go to Edit > Free Transform (Command + T), and scale it down while holding down the Alt key, as in the image below. Hit Enter to apply. While the selection is still active, go to Filter > Blur > Gaussian Blur. Set the Radius to 3 and apply it. Now you can Deselect (Command + D).
Now go to Kitchen > Kettle > Have Some Coffee... :) This is a good point to take a break. Be sure to save your document first though.

Step 15
Now we're going to make the bubbles. We'll draw just one bubble. Instead of making copies of it, we'll define it as a brush preset, and populate it using the Brush Tool. Let's create a New Document with a width of 300px, Height of 300 px, Resolution set to 300 pixels/inch, and a Background of white.
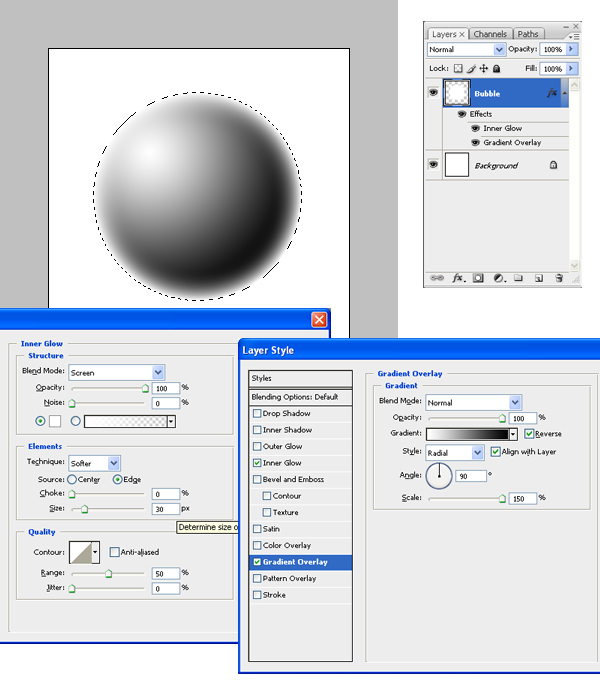
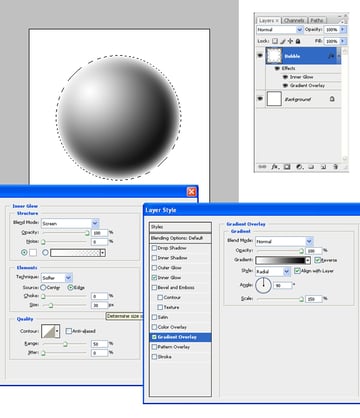
Make a circular selection using Elliptical Marque Tool. Create a new layer and name it "Bubble." Fill the selection with white. We'll apply two layer styles to give it a bubble-like look. First apply a Gradient Overlay and use these settings: Blend Mode of Normal, Opacity of 100%, Gradient of Black to White, Style of Radial, Reverse set to checked, and Scale set to 150%. Move the center of the gradient to left and up as you can see in the below image. Then apply an Inner Glow and use these settings: Blend Mode of Screen, Opacity of 100%, Color of white, Size set to 30px.
Step 16
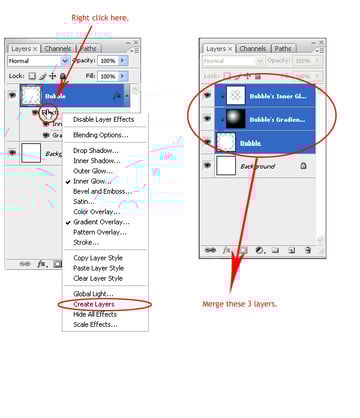
On the Layer Palette, Right-click on the Effects of the "Bubble" layer and choose Create Layers. This will turn the Layer Styles to Layers. Then select "Bubble" layer and two effect layers and go to Layer > Merge Layers (Command + E).

Step 17
Go to Image > Adjustments > Curves (Command + M). You can see the Curves settings in the image below. Go to Image > Adjustments > Invert (Command + I). Now we're going to define this as a Brush Preset. With the selection still active, go to Edit > Define Brush Preset. Name the preset "Bubble Brush."


Step 18
We're ready to brush our bubbles now. Pick the Brush Tool and go back to the beer glass document. Open the Brush Preset picker and pick the brush you've just defined. Open the Brushes Palette, see the image below for the changes to the settings.


Step 19
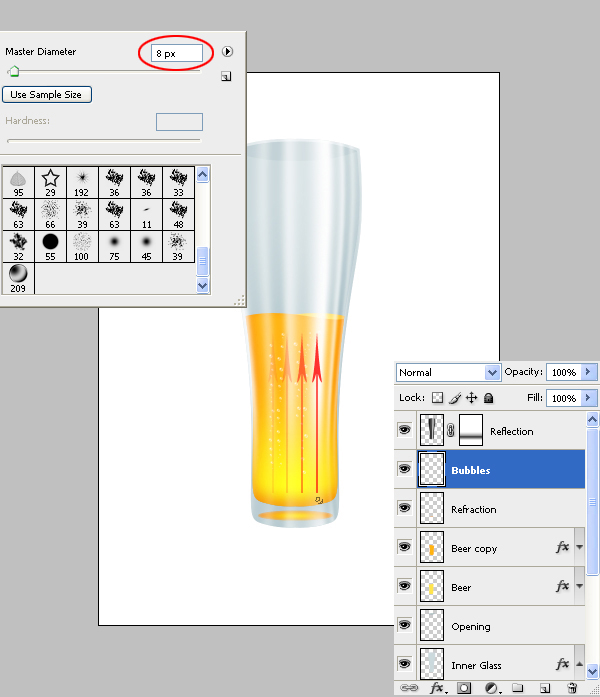
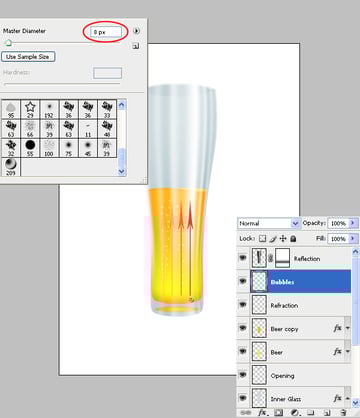
Create a new layer below the "Reflection" and name it "Bubbles." Open the Brush Preset picker and set the Master Diameter to 8 px. Get white as your Foreground Color and beginning from the bottom, paint the columns of bubbles. The black areas of the brush will be filled with the foreground color, that's why we have inverted the bubble before defining it as a brush preset.
Step 20
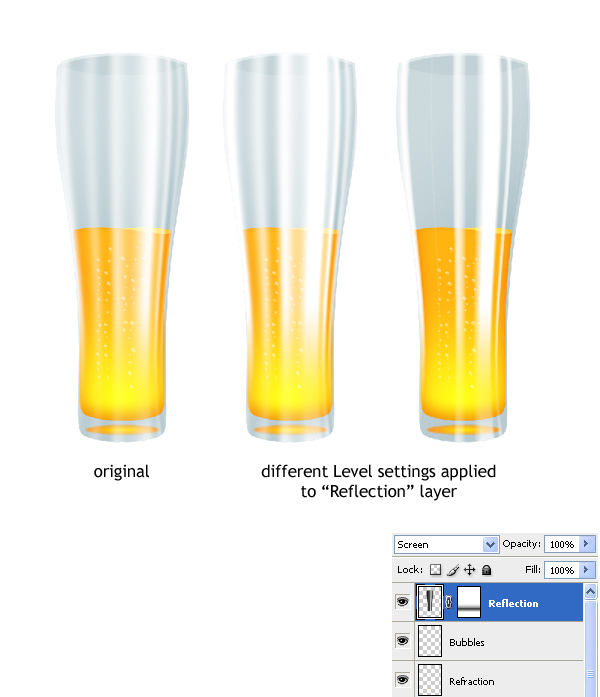
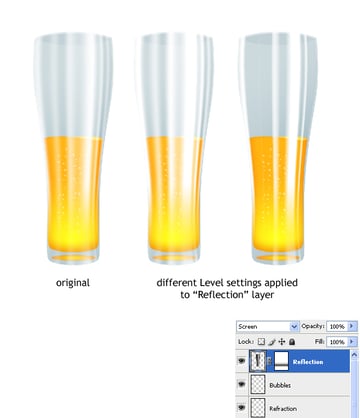
We're going to merge the layers, so it's a good time to make some final touches. You can experiment with applying Levels adjustments to the "Reflection" layer to have some variations for the reflection.
Step 21
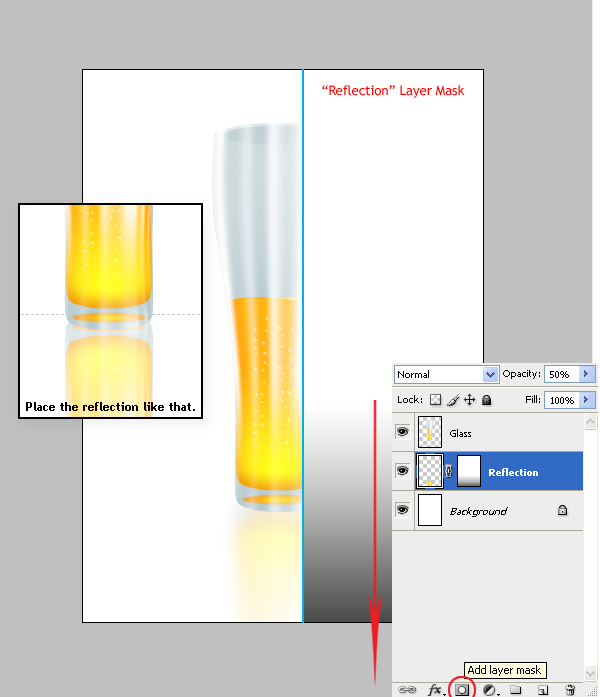
Select all the layers except the "Background" layer and go to Layer > Merge Layers (Command + E). Name the merged layer "Glass." Duplicate the "Glass" layer and name it "Reflection." Move the "Reflection" layer under the "Glass." Go to Edit > Transform > Flip Vertical in order to mirror the image vertically. Move the reflection down and place it as shown in the following image.
Go to Filter > Blur > Gaussian Blur. Set Radius to 12 and apply. Click the Add Layer Mask button located at the bottom of the Layer Palette. Pick the Gradient Tool and fill the mask with a gradient, as in the image below. The mask will make the reflection gradually vanish.

Step 22
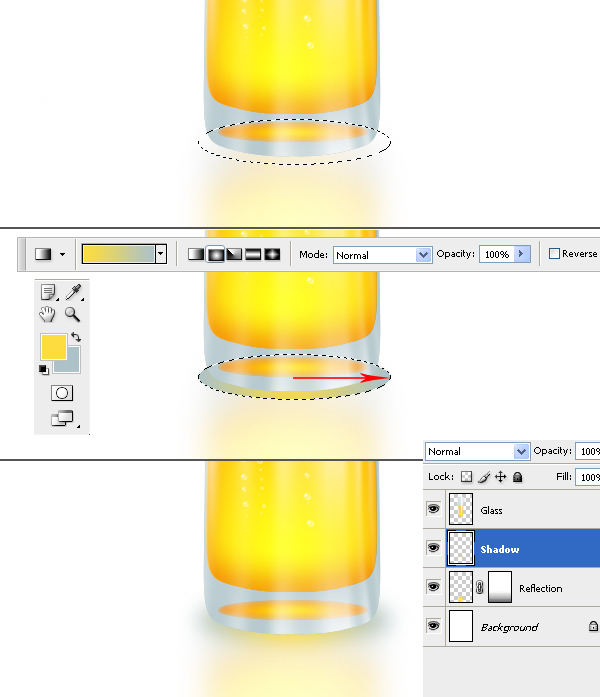
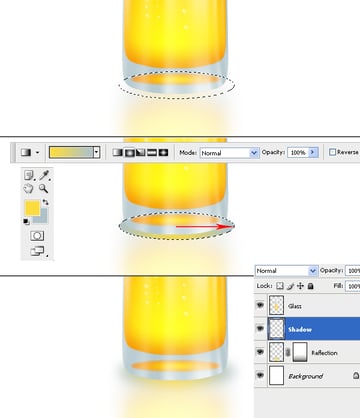
Create a new layer above the "Reflection" layer, and name it "Shadow." Make an elliptical selection using the Elliptical Marque Tool. We're going to fill the selection with a Radial Gradient. Get the Gradient Tool, and pick #fcdc3f as the Foreground color and #adc2c8 as Background color. Fill the selection from the center to the edge with a Foreground to Background gradient.
Go to Select > Deselect (Command + D). Go to Filter > Blur > Gaussian Blur, set Radius to 14, and apply. You can also bring the Lightness of the shadow a little bit down by going to Image > Adjustments > Hue/Saturation.
Final Image
I finally filled the "Background" layer with a radial gradient from white to pale blue. And that was the final step for that tutorial. You can view the final image below or the larger final image here. Cheers!


