

I must admit that there is no other love for me rather than the iPhone but when I first saw the HTC Touch Diamond mobile I was amazed because it looks so good. It looks so good that I decided to write a tutorial to show you how I made it. This will be a long tutorial so go get some coffee for this.
Final Image Preview
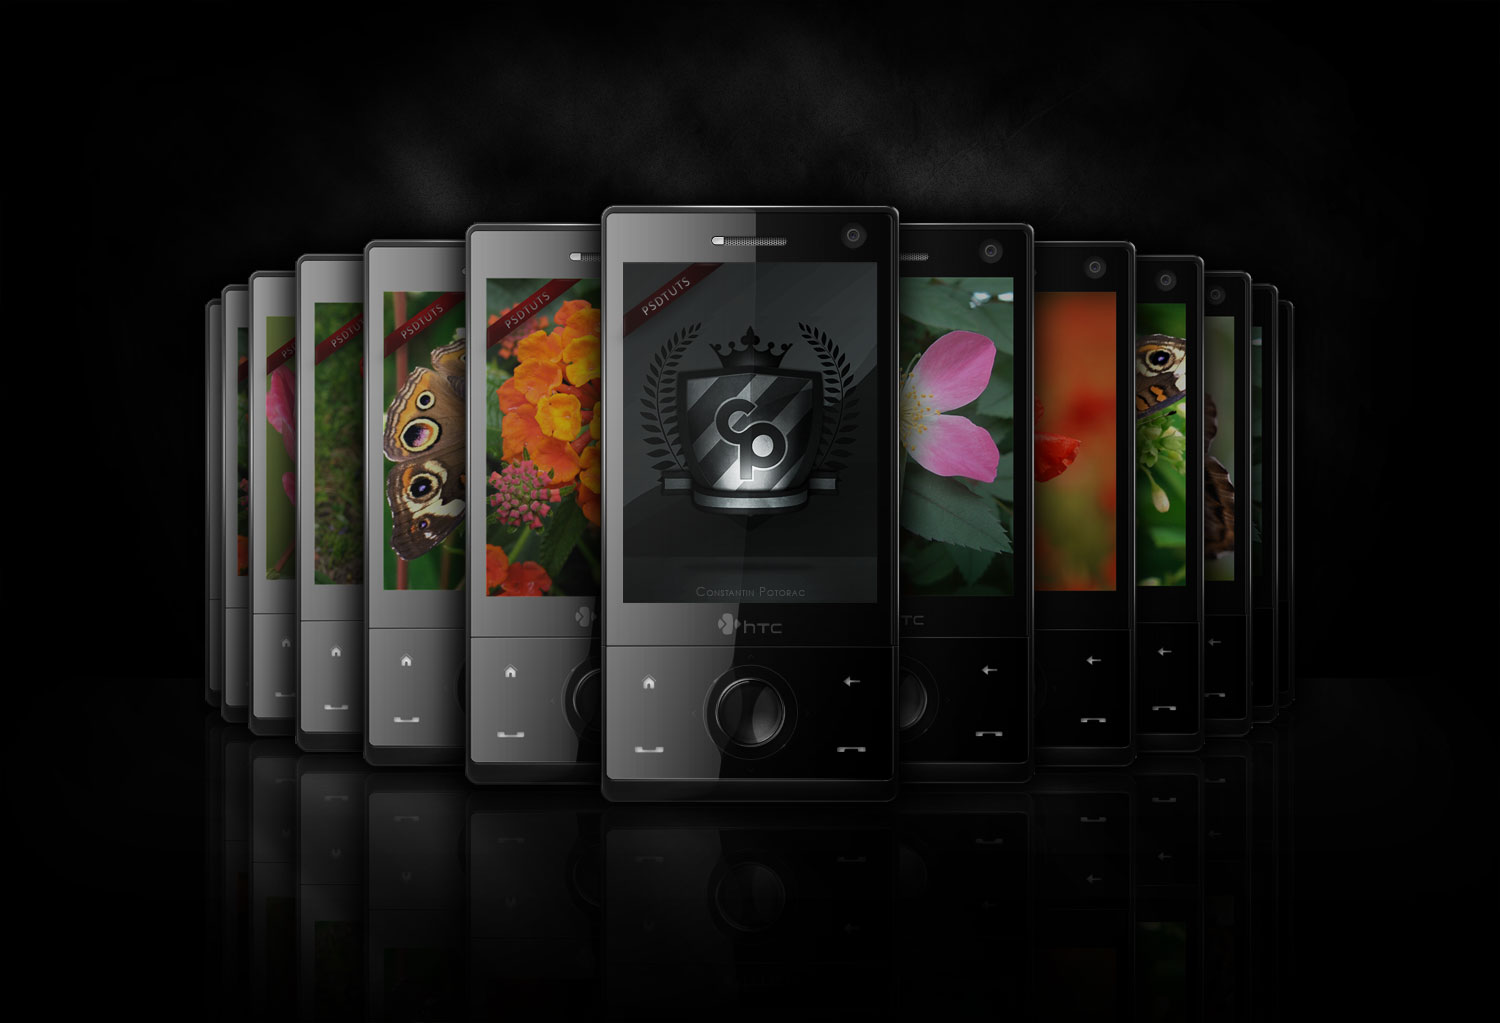
Before we get started, let's take a look at the image we'll be creating. Click the screenshot below to view the full-size image. As always, the layered Photoshop file is available via our Psdtuts+ Plus membership.
Step 1
Let's start by making a new white document at 1000px by 1000px.


Step 2
Now we'll make the base of the phone. Using the Rounded Rectangle Tool (U) set to 20 pixels, make a shape as shown below.


Step 3
Next using the same tool you need to hold down the Alt button before you start making a shape. This will extract from the first shape you made. Also, use the rulers and grid to help set the shape of the phone. When you're done name the shape "Phone shape 1."


Step 4
Next you need to duplicate this layer, fill the copy with #5b5b5b, and name it "Phone shape 2."


Step 5
Enter the Blending Options by double-clicking in the "Phone shape 2" layer and enter the settings shown below. You can experiment, but I personally like those settings.


Step 6
Make a new layer and name it "light." Then Ctrl + Click on the "Phone shape 2" layer thumbnail to make a selection. Then using the Rectangular Marquee Tool (M), take out some of the selection.


Step 7
Create a linear gradient using the Gradient Tool (G) set to white and transparent. Then drag and drop from up to down to achieve something similar to below.


Step 8
Using the Eraser Tool (E) set to 0% Hardness, start erasing some of that light, as shown below.


Step 9
Make paths at the bottom of the phone using the Pen Tool (P).


Step 10
Next you need to make a new layer and name it "light 2." Set your Brush to 1 pixel and also make sure the foreground is white. Grab the Pen Tool, right-click on the screen, and chose Stroke Path. Make sure you select the Brush from the list and also the Pen Pressure must not be checked. Than click OK. Lastly, you will need to delete the path so you can see the stroke.


Step 11
Erase the ends of the stroke. Then go to Filter > Blur > Gaussian Blur, and select a radius of 0.7 pixels.


Step 12
The next steps you'll need to do are to repeat the same lightning effect for all the sides. We also changed our background color to black. Follow the images below.


Step 13
We're done with this part of the phone. You should move it into a new folder and name it >Exterior side.> Now it's time to make the interior. First, I'll make a new folder and name it >Interior side.> In this folder make a new folder and name it >bottom side.> This is where the buttons will go. Then using the Rounded Rectangle Tool (U), make a shape as I did.


Step 14
Subtract the upper part of the shape, using the Rectangle Tool (U).


Step 15
Double-click on the layer to enter the Blending Options, and use the settings below.


Step 16
Next you need to make some more lights on this shape. You'll do this just as you did in Step 9, but this time you'll use the Line Tool (U).


Step 17
This part of the phone is finished. Now we need to make the buttons. First make a new folder and name it "Button." In this folder, you need to make a black rounded shape using the Ellipse Tool (U). As you can see, I have used the Grid because I want the buttons to be centered.


Step 18
Use the settings shown below for the Blending Options of this layer.


Step 19
Make a new circle, but this time make it a little smaller. When you start making the circle start from the middle of the other circle, hold down the Alt + Shift buttons and drag. This will help you make the circle perfect and in the right position.


Step 20
Again, change the Blending Option Settings to match those shown below.


Step 21
Make a new layer above the circles. Call it "Shine 1." Using the Gradient Tool (G) set to Radial Gradient and to white, click and drag as I did.


Step 22
Now you'll need to mask the light to show only into the button. Next set the layer to Linear Light with 34% Opacity.


Step 23
Make a new layer and name it "Shine 2." Make a selection as I did using the Elliptical Marquee Tool (M). Fill the layer with white, mask it so that it will be visible only on the button, and set it to Soft Light with 70% Opacity.


Step 24
Using the Pen Tool (P), make a path. Set the Brush to 2 pixels with a Hardness of 100%. Grab the Pen Tool (P) and make a Stroke. Again, make sure you make the Stroke to white.


Step 25
Using the Eraser Tool (E), erase the lower part of the line a little to make it fade.


Step 26
Set the stroke to 70% Opacity. Make a new layer and draw a white spot. Go to Filter > Blur > Gaussian Blur and chose an 18.5% setting. Next set the layer to Soft Light.


Step 27
You're done with the round button. Now we need to make the touch buttons. First, make a new folder above the button folder and name it "signs." Make a round shape and add the settings shown below. Also, set it to 20% Opacity.


Step 28
Next you need to add these shapes. I have made them using the Line Tool (U) and the arrows I took from the Custom Shape Tool.


Step 29
The next shapes we'll make again using the Pen Tool (P) and the Line Tool (U). Also, use these setting for all of them.


Step 30
We are finished with the lower side of the phone. Next we need to make the upper part. Here you need to make a new shape using the Rounded Rectangle Tool (U) set to 10%. Also, you need to fill it with #626262. Then subtract a side of the upper part. Review the image below to know how much you need to subtract.


Step 31
Set the Blending Options for this layer, as shown below.


Step 32
Make a new layer and name it shine. You need to first make a selection as below. Than you need to subtract a part of the selection where the two sides meet. Now you need to use the Gradient Tool (G) to fill the layer with white.


Step 33
Next you make a random path with the Pen Tool (P). Now that you have the path you need to mask the light over the phone and set the layer to 50% Opacity.


Step 34
Next we recreate the logo using the Pen Tool (P), or design your own logo.


Step 35
Now make a new folder and name it "screen." In this folder, make a new shape using the Rectangle Tool (U). Also, use the settings below for the Blending Options.


Step 36
Make another folder over this one and name it "camera." Make a new round circle and fill it with #111111. Next apply the settings below.


Step 37
Duplicate the layer, fill it with #222222, and use the settings below for the Blending Options. Also, set the Fill to 0%.


Step 38
Make a new circle and fill it to #222222. Also, for the Blending Options apply the settings shown below.


Step 39
Again, make another circle and fill it with #3b3b39. Now you need to subtract some of that circle. Use the Elliptical Tool (U) for this. Also, use the settings below for the Blending Options.


Step 40
Next you need to make another circle. This time fill it with black.


Step 41
Make a new layer over the black circle from Step 40. Using the Brush Tool we will make two little spots to make this camera look real. You need to use two different colors for this: #47307a and #1a3327.


Step 42
Repeat Step 39, but this time make a smaller circle. Also, use the color #3b3b39. Set the layer to 40% Opacity and use the settings below for the Blending Options.


Step 43
Next make another white layer that you'll Blur and change the Opacity to 5%.


Step 44
Make another folder and name it "speaker." In here create a new shape using the Rounded Rectangle Tool (U). Make sure it's set to 10 pixels.


Step 45
Insert the Blending Options shown below into the layer.


Step 46
Create a new layer and name it "pattern." To make the speaker pattern I have used the same technique Fabio used in one of his tutorials Creating a Cool Brushed Metal Surface in Photoshop (it's from Step 3 of that tutorial). The only difference between this pattern and the one from that tutoiral is that this one is black and also the dots are closer together. Do not use the Blending Options from that tutorial though, as you'll not need it.
Once the pattern is created, mask it so that it will be visible only on the speaker.


Step 47
Next make a shape similar to those shown below. Use the settings shown for the Blending Options as well.


Step 48
Make a new layer similar to the other one, but this one will be a little smaller. Fill it with this color #d7d7d7. Also, use the settings below for the Blending Options.


Step 49
The mobile is almost finished. What we'll do now is make a nice texture. Make a new layer and name it "Noise." Within this layer, make a new layer and fill it with white. Go to Filter > Noise > Add Noise and use the settings shown below. Also, set the image to Multiply with a 20% Opacity.
In the end, you'll need to make a selection of only the exterior part of the phone and mask the noise. This is so it will be visible only on this part.


Step 50
Repeat Step 49, but this time you'll make it for a different part of the phone. Follow the images below to understand how to make the selection.


Step 51
The last step is all about adding some more lights on the phone. Follow the images below and you'll understand. For the next shapes change the Opacity to 10% and lower.


Finishing the Phone
Add some personal branding to the phone. I added my logo and a small Psdtuts+ banner.


Step 52
Now that we have finished the mobile phone we need to make a nice and attractive background. This part will be all about making a great advertisement for the product.
First you'll need to move your phone to a bigger document (My size is 2215x1510) and fill the document with black.


Step 53
Next we duplicate this phone twelve times and arrange them one behind each other. Also, keep in mind that as the objects are further away they get smaller. This is the rule of perspective that you need to keep in mind. Also, as you can see I have changed the image inside each phone. I found the images over at SXC.


Step 54
For all the phones you just created, you need to add a shadow. Use the settings below for the Blending Options.


Step 55
Now you need to add a shadow for the first phone too. Let's use a different technique. Make a black shape that is similar to the phone.


Step 56
Move the shape in the back of the phone. You do this by moving the layer you just created beneath the "phone" layer. Into the Blending Options you need to use the settings shown below.


Step 57
Next we'll make the reflection for each phone. You do this by first duplicating all the phones and moving them upside down.


Step 58
Now don't simply set them all to a low Opacity. In this case you need to change some settings in the Blending Options. The thing is that each reflection will have different settings.
Set the Color Overlay to black on all of them. Next you need to lower the Opacity for each one. You will start with the two smallest phones (80%). Then continue with the rest of them 70%, 60%, and make the rest 50%.


Step 59
Make a new layer on top of all the other layers. Make a selection as I did by Ctrl + Clicking on each phone's thumbnail.


Step 60
Now using the Gradient Tool set it to black and transparent. Then make a nice gradient. Also, set the gradient to Soft Light.


Step 61
Next you need to make a new layer and place it between the phones and the reflections. Go to Filter > Render > Clouds.


Step 62
Next go to Filter > Blur > Motion Blur and use the settings shown below. Then set the layer to Soft Light. You'll be able to see a nice effect over the reflections. This makes the surface look shiny.


Step 63
Make a new layer over the one we just worked on. While using the Gradient Tool, again set it to black. In this step, we'll simply hide some of the reflections with the gradient.


Step 64
Make a new layer and move it to the back, but over the black background, and name it "Clouds." Again, you need to some clouds. Go to Filter > Render > Clouds to apply them.


Step 65
Add a Layer Mask to this layer by simply clicking the Layer Mask button in the Layers Palette. Fill the mask with black. Then using the Gradient Tool, set it as white to transparent and Radial. Remember, you need to let some of the clouds show through.


Step 66
The last step is to make a new layer over these clouds and fill it with white. Go to Filter > Noise > Add noise.


Step 67
Here is an important step that most of you might not know. Place your mouse between the "clouds" and this "noise" layer. If you press the Alt button while the mouse is between two layers, you'll see the mouse changing. While holding the Alt button, simply Click once with the mouse. This technique is similar with the masking, but it will mask the noise to show only over the layer you just linked it to.


Step 68
Set the Noise layer Opacity to 51% and Multiply.


Step 69
Set the Clouds layer to 30% Opacity.


Step 70
Last step will be to make some nice rays. If you remember Psdtuts+ had posted a great article called Best of the Web - June go and visit it. There is another great tutorial I have wrote called Sleek Phone Advertisement Flyer. If you go there and read Steps 42 to 46 you will learn how to make the rays.


Final
When you are finished with the design just save a JPG and play with the Levels, Colors, and maybe add more effects to it depending to your taste. I hope you learned something from this tutorial. Take care and keep on reading Psdtuts+. ;)


