

In this tutorial, we'll illustrate a woofer and make a simple wood texture for the background. We'll place the speaker so that it appears to be inside the wood texture. Also, we'll create screws that appear to hold it in place. Put some good music on and lets get working!
Final Image Preview
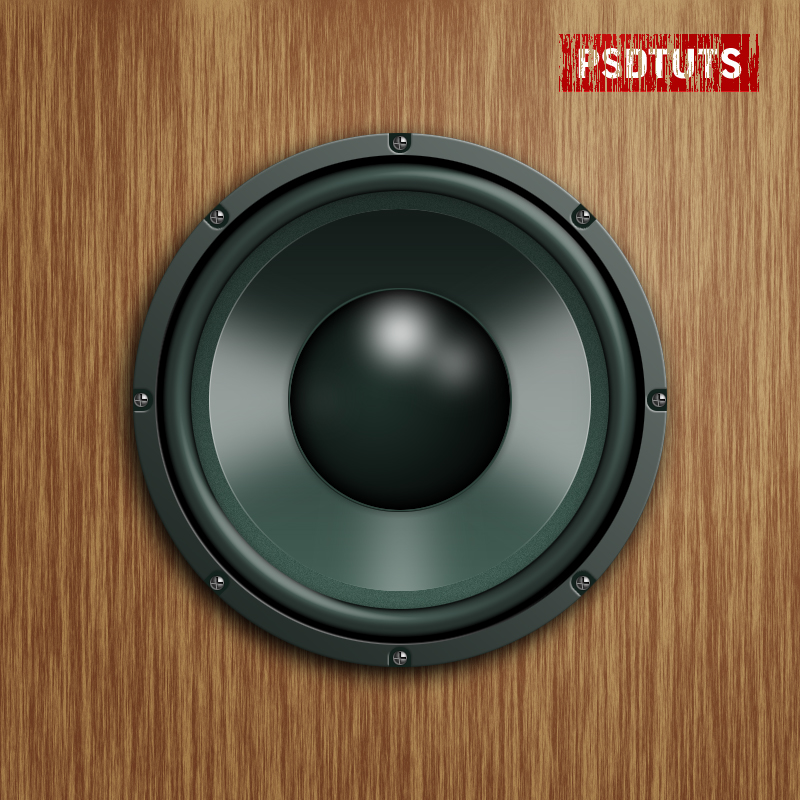
Before we get started, let's take a look at the image we'll be creating. As always, the layered Photoshop file is available via our Psdtuts+ Plus membership. You can view the final image preview below or view a larger version here.


Step 1
Create a new document that is 800 px wide and 800 px high at a resolution of 300 pixels/inch. Drag one horizontal and one vertical guide and snap them in the middle of the document. Fill the "Background" layer with 65% gray.
Get the Elliptical Marquee Tool, set style to Fixed Size and set Width and Height both to 220 px. Click anywhere on the canvas, move the cursor inside the selection, then move to the center of the page, and snap to the guides. Create a new layer and name it "Center." Fill the selection with color #1e2f29. Hit Command + D to Deselect.


Step 2
We'll apply two layer styles to give this circle a hemisphere look. First apply an Inner Glow with these settings: Blend Mode of Multiply, Opacity set at 100%, Color set to black, and Size set to 25 px. Then apply a Gradient Overlay using these settings: Blend Mode set to Multiply, Gradient set at black to white, Reverse checked, with a Style of Radial, Angle set to 75 degrees, and Scale set at 150%.


Step 3
Create a new layer and name it "Center Highlight." Pick white as your Foreground Color and get the Brush Tool. Single click on the areas as in the image below with 55 px, 30 px, and 10 px brushes with a Hardness of 100%. Command-click on the "Center" Layer Thumbnail to load the selection, go to Filter > Blur > Gaussian Blur and apply with a Radius of 16 px.


Step 4
Create a new layer and name it "Center Ring." Make sure the selection is still active, then go to Edit > Stroke. Set the color to #2e453d, set Location to Outside, and hit OK. Apply an Outer Glow Layer Style with the following settings: Blend Mode of Multiply, Opacity set at 40%, Color set to Black, and Size set to 8 px. Then apply a Bevel and Emboss Layer Style and use these settings: Style of Inner Bevel, Direction set to Up, Size set to 7 px, Soften set to 0 px, Angle and Altitude set to 50, and Highlight Opacity set to 0%.


Step 5
Create a new layer below the "Center" layer and name it "Cone." Get the Elliptical Marquee Tool. This time set the Width and Height both to 382 px. Click anywhere on the canvas, then move the cursor inside the selection. Next, move to the center of the page and snap to the guides. Fill the selection with color #425d54. Apply a Gradient Overlay Layer Style with these settings: Blend Mode set to Multiply, Opacity set at 70%, Gradient set at black to white, with a Style of Linear, and Angle set to -90 degrees.


Step 6
Create a new layer above the "Cone" layer and name it "Cone Edge." Command-click the "Cone" layer, and fill the selection with white. Make sure the Elliptical Marquee Tool is still selected, move the selection 1 px right using the Right Arrow key on the keyboard, and hit Delete to clear. Deselect by hitting Command + D. Get the Eraser tool, set the Master Diameter to 215 px and Hardness to 0%. Erase the upper and lower edges of the layer with one click, as you can see in the image below. Set the "Cone Edge" Layer Opacity to 40%.


Step 7
We'll do the same thing for the right edge of the cone. Command-click the "Cone" layer to load the selection. Create a new layer above the "Cone Edge" layer and give it the same name, "Cone Edge." Fill the selection with white. Get the Elliptical Marquee Tool and move the selection 1 px left using the Left Arrow key. Hit Delete to clear, then deselect. Grab the Eraser Tool and erase the upper and lower edges. Lastly, set the Layer Opacity to 40%.


Step 8
Now we'll make the reflections on the cone. Create a new layer above the "Cone" layer and name it "Reflection." Get the Rectangular Marquee Tool and make a selection, as in the image below. Fill it with white, and hit Command + D to Deselect.
Go to Edit > Transform > Perspective, grab the top right handle of the Bounding Box and drag it down to the middle of the page before applying it. Go to Filter > Blur > Gaussian Blur and apply with a Radius of 25 px. Command-click the "Cone" layer to load the selection. Go to Select > Inverse and hit Delete to Clear, then set Layer Opacity at 50%.


Step 9
We'll make two more reflection on the cone. First create a new layer above the "Reflection" layer and name it "Reflection" as well. Get the Rectangular Marquee Tool, select a rectangular area on the right of the cone, as in the image below, and fill with white. Note that this second rectangle is bigger than the first one. Hit Command + D to Deselect.
Go to Edit > Transform > Perspective, grab the top left handle of the Bounding Box, and drag it to the center of the page before applying it. Go to Filter > Blur > Gaussian Blur and apply with a Radius of 25 px. Command-click the "Cone" layer to load the selection. Go to Select > Inverse and hit Delete to Clear, then set the Layer Opacity at 50%.
In order to create the final reflection on the cone, make a rectangular selection in the lower part of the cone, then create a new layer named "Reflection," and fill the selection with white. Deselect by hitting Command + D. Go to Edit > Transform > Perspective, this time grab the top left or top right handle and move it to the center of the page before applying. Once more go to Filter > Blur > Gaussian Blur and apply with a Radius of 25 px. Command-click the "Cone" layer to load the selection. Go to Select > Inverse and hit Delete to Clear, then set the Layer Opacity at 50%.


Step 10
Create a new layer below the "Cone" layer and name it "Plate." Get the Elliptical Marquee Tool. This time set the Width and Height both to 423 px. Click anywhere on the canvas, then move the cursor inside the selection and toward the center of the page, and snap to the guides. Fill the selection with color #48685d. Go to Filter > Noise > Add Noise, set Amount at 2%, set Distribution to Gaussian, with Monochromatic checked, and hit OK, then Deselect.
Apply a Gradient Overlay Layer Style with these settings: Blend Mode set to Multiply, Opacity at 60%, Gradient set at black to white, with a Style of Linear, Angle set to -90 degrees, and Scale set at 150%. Apply an Inner Glow and use the following settings: Blend Mode of Multiply, Opacity set at 25%, Color set to black, and Size set to 13 px.


Step 11
Create a new layer above the "Background" layer and name it "Back" Get the Elliptical Marquee Tool. This time set the Width and Height both to 534 px. Click anywhere on the canvas, then move the cursor inside the selection and in the center of the page snap to the guides. Fill the selection with color #13221d and then Deselect.


Step 12
Now lets tidy up our Layers Palette a little bit. There are layers with the same name and we're going to merge them. Select all "Cone Edge" layers and go to Layer > Merge Layers. Select all "Reflection" layers and merge them as well.


Step 13
Create a new layer on the top of the layer stack and name it "Big Ring." Get the Elliptical Marquee Tool. This time set the Width and Height both to 474 px. Click anywhere on the canvas, then move the cursor inside the selection and toward the center of the page snap to the guides. Fill the selection with color #445852. Hit Command + D to Deselect.
Grab the Elliptical Marquee Tool, set the Width and Height both to 418 px. Click anywhere in the canvas, then move the cursor inside the selection and toward the center of the page snap to the guides. Now we'll clear the selected area by hitting Delete. Hit Command + D to Deselect.


Step 14
Apply Bevel and Emboss Layer Style to "Big Ring" layer with these settings: Style set to Inner Bevel, Depth at 365%, Direction set to Up, Size set to 30 px, and Soften set to 7 px. Also, in the Shading controls set Angle and Altitude to 50 degrees, then set Gloss Contour to Cove - Deep, set Highlight Opacity at 30%, and set Shadow Opacity to 65%. We'll also apply an Inner Glow using these settings: Blend Mode set to Multiply, Opacity at 90%, Color set to black, and Size set to 7 px.


Step 15
Create a new layer above the "Back" layer and name it "Dark." Grab the Elliptical Marquee Tool, and in the Tool Options set the Width and Height both to 490 px. Click anywhere in the canvas, then move the cursor inside the selection and toward the center of the page snap to the guides. Fill the selection with black and Deselect.


Step 16
Create a new layer above the "Back" layer and name it "Hole." Get the Rounded Rectangle Tool, set it to Fill Pixels, and set Radius to 10 px. Next, draw a rounded rectangle, as in the image below. Make sure it is centered to the vertical guide and it is placed a few pixels above the "Dark" layer.
Go to the Layers Palette and duplicate the "Hole" layer. Hit Command + T for Free Transform mode. Move the Transformation Origin to the center of the page. If you can't grab the origin, try grabbing it with the Alt key pressed. Rotate the layer 180 degrees.
Now select both hole layers and go to Layer > Merge Layers (Command + E.) Duplicate the holes layer again. Hit Command + T and rotate the layer 90 degrees. Select both hole layers and merge them again. Duplicate the layer one more time. Hit Command + T and rotate the layer 45 degrees this time. Select the two hole layers and merge them. Name the merged layer "Holes."


Step 17
Create a new layer above the "Back" layer and name it "Outer Ring." Command-click the "Back" Layer Thumbnail to load the selection. Fill the selection with color #2a3732. Now Command-click the "Holes" Layer Thumbnail to load the selection. Hide the "Holes" layer. Make sure the "Outer Ring" layer is selected in the Layers Palette. Hit Delete to clear the selected area. Deselect by hitting Command + D, and then Delete the "Holes" layer.


Step 18
Apply a Bevel and Emboss Layer Style to the "Outer Ring" layer using these settings: Style set to Inner Bevel, Depth set at 1%, Direction set to Up, Size set to 1 px, Angle and Altitude set to 50 degrees. Apply a Bevel and Emboss to the "Dark" layer as well, with these settings: Style set to Inner Bevel, Depth set at 32%, Direction set to Down, Size set to 2 px, and Angle and Altitude set to 50 degrees. Also, apply a Gradient Overlay with the following settings: Blend Mode set to Normal, Opacity at 30%, Gradient set at black to white, Style of Linear, and Angle set to 50 degrees.


Step 19
Create a new layer on the top of the layer stack. Name it "Screw." Grab the Elliptical Marquee Tool and set the Style to Normal. Make a selection, as in the image below, then fill the selection with 10% gray. Next, apply these Layer Styles to the "Screw" layer:
- Gradient Overlay with these settings: Blend Mode set to Normal, Opacity at 80, Gradient set at Black to White, Reverse checked, with a Style of Radial, Angle set to 90 degrees, and Scale set at 115%. Also, drag the center of the gradient up and toward the right.
- Inner Glow using these settings: Blend Mode of Multiply, Opacity set at 15%, Color set to Black, and Size set to 5 px.
- Drop Shadow with these settings: Blend Mode set to Multiply, Opacity at 100%, Color set to black, Angle set to 50 degrees, Distance set to 0, and Size set to 2 px.
Create a new layer above the "Screw" and name it "Screw Highlight." Command-click the "Screw" layer Thumbnail to load the selection, and fill the selection with White. Make sure the Elliptical Marquee Tool is selected, then move the selection 1 px right and 1 px up using the Arrow keys. Hit delete to Clear and then Deselect. Also, set the Layer Opacity to 40%.


Step 20
Grab the Rectangular Marquee Tool, then make a selection as shown below. Create a new layer at the top and name it "Screw Dent." Fill the selection with 10% gray. Make another rectangular selection and fill it again with 10% gray. Deselect by hitting Command + D.
Apply an Inner Shadow Layer Style to this layer and use these settings: Blend Mode set to Multiply, Opacity set at 100%, Angle set to 50 degrees, Distance set to 1 px, and Size set to 2 px. Set the "Screw Dent" layer's Blending Mode to Difference. Select "Screw," "Screw Highlight," and "Screw Dent" layers in the Layers Palette, then merge them by going to Layer > Merge Layers (Command + E). Name the merged layer "Screw."


Step 21
Now duplicate the "Screw" layer and place one screw at each screw hole. You can drag them to copy while holding down the Alt key. Now we're going to merge all the layers except for the "Background" layer. Make the "Background" layer invisible. Make sure one of the visible layers is selected, go to Layer > Merge Visible. Now we can start making the wood texture.


Step 22
Create a new layer above the "Background" layer and name it "Wood." Pick #bb9966 as your Foreground and #885533 as your Background Color. Fill the layer with the Foreground Color and go to Filter > Render > Fibers. Set Variance to 16 and Strength to 42 and hit OK. Then apply a Gradient Overlay Layer Style with these settings: Blend Mode set to Soft Light, Opacity at 45%, Gradient set at black to white, Reverse checked, Style set at Radial, Angle set to 75 degrees, and scale set at 150%. While the Gradient Overlay dialog is open, move the center of the gradient to the upper right corner by clicking and dragging on the page.


Step 23
Now right-click on the Psdtuts+ logo at the top of this page and click Copy. Paste into Photoshop and place it as shown. Rename the layer as "PSDtuts." Make sure the "Wood" layer is selected in the Layers Palette. Hit Command + A to Select All and Command + C to copy. Go to the Channels Palette, then create a new Channel, and hit Command + V to paste the wood texture into this channel. Go to Image > Adjust > Levels and tweak the levels as shown below.


Step 24
Command-click the Channel Thumbnail to make a selection out of the white areas, then go back to the Layers Palette. Go to the "PSDtuts" layer and hit Delete to Clear the selected areas, then Deselect.


Conclusion
Go to the "Speaker" layer and apply a Drop Shadow Layer Style with these settings: Blend Mode set to Multiply, Opacity at 100%, Angle set to 50 degrees, Distance set to 10 px, Spread set to 3 px, and Size set to 27 px.
That Drop Shadow was the final step of our tutorial. Hope you learned something new and had fun. You can view the final image below or view a larger version here.
Subscribe to the Psdtuts+ RSS Feed for the best Photoshop tuts and articles on the web.


